Please disable your adblock and script blockers to view this page

Search this blog

Saturday 4 July 2015

ADF Basics: How to invoke model layer methods from managed bean (Best Practice to write business logic in ADF)

Again a post about ADF Basics for those who are starting with ADF
This topic is posted multiple times and one of the most asked question on OTN

How to access AM method in bean ?
How to pass parameters to model from managed bean (viewController) ?
How to pass taskFlow parameter to model ?

Or sometimes I have to tell user that you should not access ApplicationModule or not update model from managed bean and then i post a link about this
I often post a link of Frank's blog
Best practice invoking business services methods from JSF beans
It is well explained but still user not able to do because he/she doesn't know about clientInterface, pageDef etc

So i thought to write a step by step implementation of this and if you want to know why it is best to call method through binding layer ?
Then please refer Frank's blog :)

What i am going to explain is How to call a method defined in ApplicationModule Impl class in managed bean ?
So for this first i need to define a method in ApplicationModule Impl class


Here i am using Departments table of HR Schema and i have created a method to create new row in Departments viewObject
See implementation part -

  • To create AMImpl class--> Open ApplicationModule in editor--> Goto Java tab--> Click on edit (pencil) icon and check the checkbox to generate class


  • Now write your logic and create method here so i have created a method to create department record and this method takes a parameter i;e DepartmentId

  •     /**
         *Custom Method to create row in departments viewObject
         */
        public void createDepartmentRecord(Integer deptId) {
            ViewObject deptVo = this.getDepartmentsVO1();
            Row newRow=deptVo.createRow();
            newRow.setAttribute("DepartmentId", deptId);
            deptVo.insertRow(newRow);
        }
    

  • Next step is to add this method to client interface so that we can access this , Again open AM in editor -->Go to Java tab--> Click on edit icon of clientInterface--> Shuttle method to selected side


  • Now to add this method in pageDef , Open page in editor--> Click on Bindings tab (bottom of editor)--> Click on green plus icon of bindings section--> Select methodAction and click on ok


  • Now select method name here and click ok


    Now you can see this method is added in pageDef


  • Now time to call this method in managed bean so for that added a button in page and created actionListener in bean . See the code 

  •     /**Method to get Binding Container of page
         * @return
         */
        public BindingContainer getBindings(){
            return BindingContext.getCurrent().getCurrentBindingsEntry();
        }
    
        /**Calling method defined in AMImpl class to create new Department
         * @param actionEvent
         */
        public void callAMMethodToCreateDepartmentAction(ActionEvent actionEvent) {
            //Get OperationBinding of method
            OperationBinding ob=getBindings().getOperationBinding("createDepartmentRecord");
            //Passing parameter to method -Get parameter map and use paramater name as key
            ob.getParamsMap().put("deptId", 9999);
            //Execute this method
            ob.execute();
            //Check for errors
            if(ob.getErrors().isEmpty()){
                // Successfully Executed
            }
        }
    

  • Now run application and check , is it working ? ;)

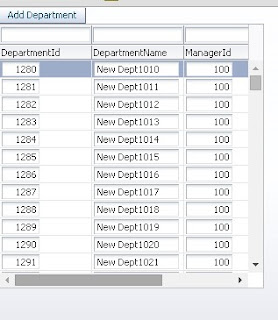
On click a new row is inserted in table with DepartmentId 9999


All done :)
In same way you can call method defined in any model implementation class, remember don't access ApplicationModule or viewObject directly , make use binding layer
and again why it is best practice ?? to know this read Frank's blog :)

Cheers :) Happy Learning 

Saturday 27 June 2015

ADF Basics: Using contentStyle and inlineStyle property to change basic styling of component in ADF Faces

Hello All,
Again a post about ADF Basics for beginners
I have seen lots of thread on OTN about changing basic styles of component . for example,

How to change font size of inputText ?
How to change color of inputText/outputText ?
How to change color of link or button ?

and everyone starts creating a css/skin for these minor changes but there is no need of that
Skin should be used for complex styles or you have apply same style to all components of your application

If you will read API docs then you will know this, See what docs says about inlineStyle property-

The CSS styles to use for this component. This is intended for basic style changes; you should use the skinning mechanism if you require any complex style changes. The inlineStyle is a set of CSS styles that are applied to the root DOM element of the component. Be aware that because of browser CSS precedence rules, CSS rendered on a DOM element takes precedence over external stylesheets like the skin file. Therefore skins will not be able to override what you set on this attribute.


Difference between contentStyle and inlineStyle -


contentStyle property used to style content part of component like if you want to change color of inputText or any other input component then you have to specify this in contentStyle property of that component

inlineStyle is about whole component and also available in output (outputText) or collection (table, tree etc) component's property where contentStyle is not there. This can be use to set width, height ,border or color of output components etc.

So this is enough about theory , no one likes theory ;) , Everyone is looking for some code that is ready to use
Let's see some practical usage of both properties -

Change font, color, size(width), padding of input components (af:inputText, af:inputDate, af:selectOneChoice etc)-


Used this in contentStyle property of components
width:150px;color:white;font-weight:bold;font-size:small;background-color:red;padding:5px;
and check the output


you can also change input text to uppercase , lowercase, Initcap using contentStyle property, just use any of this -
text-transform:uppercase; // To change in uppercase
text-transform:lowercase; //To change in lowercase
text-transform:capitalize; //To change in initcap

Change properties of output components , color of link/button -

Output components doesn't have contentStyle property as there is not content part in component , here we make use of inlineStyle property
See what happens on applying same style in outputText and link using inlineStyle


It looks good :) , but same style doesn't work for button because button has multiple root element (we can only change width, color of text and font of button but background color and other styling can not be changed using inlineStyle property)
For more detail about button skinning check - Customize af:button (font, shape, size, color etc) using skinning -Oracle ADF (12.1.3)

Change data collection components (af:table, af:treeTable,etc) height, width -


just write in inlineStyle property like this
width:600px;height:200px;background-color:lightyellow;color:red;
background color will be applied on empty area of table and color will be applicable on column header and EmptyText
Remember to set table's height using inlineStyle ensure that autoHeightRows should be set to -1


In same way we can change color of columns too, see i have used different background colors (set background-color:colorName; in inlineStyle of af:column) for columns and it looks like this


Now it's your turn , try more combination on different components. you can do a lot using contentStyle and inlineStyle property. Remember all these changes can be done using skin also but if have some minor changes then why use skin , when framework provides these wonderful properties

Cheers :) Happy Learning

Wednesday 17 June 2015

Insert and show whitespace in ADF Faces Components (panelBox, showDetailItem etc)

This post is about a small trick
How to show whitespace in ADF Faces component properly ?
Recently i found a question on OTN about this
 How can I and spaces in the text property of a showDetailItem?
so thought to document it here for future reference

There is one more post about showing whitespace , check it
Showing white-spaces properly in ADF table column- 11g & 12c

Sometimes we need to insert some whitespace in between of some text as panelBox name, tab name in showDetailItem etc
In this case space appears in page editor but it doesn't appear on page and you can not put spacer at these points because there is only one component


Suppose you have a panelBox and requirement is to show Oracle    ADF as it's header text . In this case providing space in propertyInspector doesn't work , HTML entity for space   also doesn't work because of no DOCTYPE declaration

See here i added normal spaces in property of panelBox


 But is doesn't work :(

Now what to do ?
After lots of hit and tries finally i found that it work with equivalent entity number for  
and this magic number is  -  
So tried this -


 <af:panelBox text="Oracle&#160;&#160;&#160;&#160;&#160;&#160;&#160;ADF" id="pb1">
                    <f:facet name="toolbar"/>
                </af:panelBox>

and output is

This is the small trick , sometimes you may need this :)
Cheers, Happy Learning :)

Friday 5 June 2015

Programmatically Select all values in ADF BC based selectMany (af:selectManyCheckbox, af:selectManyChoice, af:selectManyListbox, af:selectManyShuttle) component


Hello All,
Previously i have posted a lot about component that supports multiple selection in ADF Faces (af:selectManyCheckbox, af:selectManyChoice, af:selectManyListbox, af:selectManyShuttle)
- Multiple Selection in ADF Faces

This post is about selecting all values in a component programmatically on a event like button click, value change event etc.
Note that this post is designed for ADF BC (viewObject) based components , to set values in bean based component check this-
Programmatically populate values in ADF Faces multiSelect component (af:selectManyCheckbox, af:selectManyChoice, af:selectManyListbox, af:selectManyShuttle)


So for this i have just dropped Departments viewObject as multiSelect component on page
(af:selectManyCheckbox, af:selectManyChoice, af:selectManyListbox, af:selectManyShuttle)


 Page bindings section looks like this-


Now see code of Set all values as selected button-


    /**Method to get BindingContainer of current viewPort (page)
     * @return
     */
    public BindingContainer getBindings() {
        return BindingContext.getCurrent().getCurrentBindingsEntry();
    }


    /**Method to set all values as selected in SelectMany Components.
     * @param actionEvent
     */
    public void setAllValuesToSelected(ActionEvent actionEvent) {

        int arrIndex[];
        //Get the iterator binding of component
        DCIteratorBinding deptIter = (DCIteratorBinding) getBindings().get("DepartmentsView1Iterator");
        //Get viewObject from Iterator
        ViewObject deptVo = deptIter.getViewObject();
        //Get component list binding , component is directly based on this
        JUCtrlListBinding list = (JUCtrlListBinding) getBindings().get("DepartmentsView1");
        DCIteratorBinding iterList = list.getDCIteratorBinding();
        RowSetIterator rsi = deptVo.createRowSetIterator(null);
        int i = 0;
        int rowCount = (int) deptVo.getEstimatedRowCount();
        //Initialize array and set it's size (equal to number of rows in List)
        arrIndex = new int[rowCount];
        while (rsi.hasNext()) {
            //Get viewObject next row from RowSetIterator
            Row nextRow = rsi.next();
            //Set this row as page iterator's current row
            iterList.setCurrentRowWithKey(nextRow.getKey().toStringFormat(true));
            //Now get index of this row
            int indx = iterList.getCurrentRowIndexInRange();
            //Add it to array
            arrIndex[i] = indx;
            i++;
        }
        rsi.closeRowSetIterator();
        // Set as selected indices
        list.setSelectedIndices(arrIndex);
    }


All done, now run and check application , click on button and see what happens ?


Great, it's working :)
I have explained one more approach to set values in multi select component that makes use of component binding
check it - Set values in af:selectManyChoice programmatically - Oracle ADF

Sample ADF Application-Download
Cheers :) Happy Learning

Thursday 4 June 2015

Create and set clientAttribute to ADF Faces component programmatically to pass value on client side JavaScript


This post is next in series of "Working with ADF Faces Components programmatically"

So this post is about creating client Attribute, applying it to component and setting it's value programmatically
this requirement comes in picture when user is dealing with dynamic layout means components are created programmatically at run time and it is not possible to apply clientAttribute and other properties declarative

In this i am extending my previous post -
Apply Client/Server listener to programmatically created components, apply JavaScript to ADF Faces components at run time

In previous post i have described about applying client listener and server listener programmatically
here we will see how to pass a variable value to java script function using client attribute
You can read more about af:clientAttribute here

From oracle docs-
The clientAttribute tag specifies the name/value for an attribute which will both be made available both on the server-side (Faces) component as well on on the client-side equivalent. This tag will be ignored for any server-rendered components, as it is only supported for the rich client. ClientAttributes are not synchronized to the server since unknown attributes from the client are not synchronized to the server.


Lets' see how we can do this ,It's simple just check this code -

//Code from previous post to create inputText programmatically 
//http://www.awasthiashish.com/2015/05/apply-clientserver-listener-to.html
        RichInputText ui = new RichInputText();
        ui.setValue("Programmatically Created Input Text");
        ui.setId("pit1");
        ui.setContentStyle("width:200px;color:navy");

Here i am not writing code to apply client/server listener again , refer previous post for that
See the code to add client attributes to component (inputText)

        // A Set that contains all clientAttributes
        java.util.Set<String> clientAttributes = new HashSet<String>();

        // Add client attribute's name
        clientAttributes.add("clientAttribute1");
        clientAttributes.add("clientAttribute2");
        clientAttributes.add("clientAttribute3");

        //Add these attributes to a UI Compoenent
        ui.setClientAttributes(clientAttributes);

        //here assign values to client attributes
        ui.getAttributes().put("clientAttribute1", "Oracle ADF");
        ui.getAttributes().put("clientAttribute2", 9999);
        ui.getAttributes().put("clientAttribute3", "Ashish Awasthi");

So all done , now check it
For that i have used this javascript method

function demoJsFunction(evt) {
                  var comp = evt.getSource();
                  alert(comp.getProperty('clientAttribute1'));
                  alert(comp.getProperty('clientAttribute2'));
                  alert(comp.getProperty('clientAttribute3'));
               
                  evt.cancel();
              }
 

this method is called using client listener on input text and see the alert messages
First client attribute value-

Second client attribute value-

Third client attribute value-

So this is working :)
Cheers :) Happy Learning

Friday 29 May 2015

I am an Oracle ACE !

Hello All
Hope you all are doing well

I have a good news to share with you all that i have received an email from Oracle ACE team about accepting Oracle ACE Award and who will not accept it ? ;)

So i have accepted this award and  I am an Oracle ACE now :)


You want to know what is this Oracle ACE ?
The Oracle ACE program highlights excellence within the global Oracle community by recognizing individuals who have demonstrated both technical proficiency and strong credentials as community enthusiasts and advocates

I am proud to be part of this elite group of Oracle experts. It's really a big honor to get this title
I am 16th Oracle ACE from India :) This is the biggest award in my career now i'm more committed towards community


Take a moment to check my profile as ACE- Oracle ACE Details- Ashish Awasthi
Special thanks to Oracle ACE Waslley Souza for nominating me and many thanks to Oracle ACE Team, blog readers , my family , friends and well wishers for their support


Thanks
Ashish Awasthi

Apply Client/Server listener to programmatically created components, apply JavaScript to ADF Faces components at run time

Hello All

This post is next in series of "Working with ADF Faces Components programmatically"
Previous posts are-

Creating dynamic layout (form and UI Component) using ADF Faces
Get Value from programmatically created components , Iterate over parent component to get child values in ADF Faces 
Apply ActionListener to programmatically created buttons/link in ADF

Now this post is about applying client listener & server listener (to execute some javascript function) to a programmatically created component (inputText, outputText etc)

Let's see the implementation part (Jdev 12.13) -

  • First created a FusionWebApplication and a page in viewController project
  • Dropped a button on page , on this button action i will create an inputText programmatically
  • To create new inputText i have added following code (described in previous posts)


  •     /**Method to add dynamically created component to a parent layout
         * @param parentUIComponent
         * @param childUIComponent
         */
        public void addComponent(UIComponent parentUIComponent, UIComponent childUIComponent) {
            parentUIComponent.getChildren().add(childUIComponent);
            AdfFacesContext.getCurrentInstance().addPartialTarget(parentUIComponent);
        }


            //Code to create af:inputText and add it to panelgroup layout
            RichInputText ui = new RichInputText();
            ui.setValue("Programmatically Created Input Text");
            ui.setId("pit1");
            ui.setContentStyle("width:200px;color:navy");
            //getParentGroupLayoutBind is the component binding of parent panel group layout
            addComponent(getParentGroupLayoutBind(), ui);
    

  • Now first part is done - Creation of input text , next is to assign client and server listener to it
    So for that first we have to add some JavaScript function in page that will be called using clientListener
    I have added this JavaScript function in page, it just fires a custom event from client and pass component value as parameter

  •         function demoJsFunction(evt){
              var comp = evt.getSource();
              alert(comp);
              AdfCustomEvent.queue(comp, "ServerEventToGetValue", {fvalue:comp.getSubmittedValue()}, true);
              evt.cancel();
            }


  • One more thing is to define server listener method in managed bean so that we can apply it to inputText at run time

  •     /**Server Listener - It will be called on execution of client side javascript
         * @param clientEvent
         */
        public void testServerListener(ClientEvent clientEvent) {
            //To get value passed from Client Event
            String val = clientEvent.getParameters().get("fvalue").toString();
            FacesMessage msg=new FacesMessage("Server Listener Called and value in inputText is - " + val);
            msg.setSeverity(FacesMessage.SEVERITY_INFO);
            FacesContext.getCurrentInstance().addMessage(null, msg);
           
        }
    

  • Now create clientListener/ServerListener programmatically and assign both to inputText
    Pass server listener method name along with managed bean name

  •         // Create new Client Listener and assign method name and type
            ClientListenerSet CL = new ClientListenerSet();
            CL.addListener("click", "demoJsFunction");
            //Add Server listener , assign client event name and resolve pre-defined serverlistener
            CL.addCustomServerListener("ServerEventToGetValue",
                                       getMethodExpression("#{viewScope.Testbean.testServerListener}"));
    
            // Add clientListener/ServeListener to inputText
            ui.setClientComponent(true);
            ui.setClientListeners(CL);
    

    Helper method to resolve expression-

        /**To Resolve ServerListener method
         * @param s
         * @return
         */
        public MethodExpression getMethodExpression(String s) {
    
            FacesContext fc = FacesContext.getCurrentInstance();
            ELContext elctx = fc.getELContext();
            ExpressionFactory elFactory = fc.getApplication().getExpressionFactory();
            MethodExpression methodExpr = elFactory.createMethodExpression(elctx, s, null, new Class[] {
                                                                           ClientEvent.class });
            return methodExpr;
    
        }
    

  • All done , now run application and check , click on button it will create a inputText
         now click on input text and see server listener is called :)

This is how we can apply javascript in programmatic created components
Cheers :) Happy Learning

Saturday 16 May 2015

Apply ActionListener to programmatically created buttons/link in ADF


This post is next in series of "Working with ADF Faces Components programmatically"
Previous posts are-
Creating dynamic layout (form and UI Component) using ADF Faces
Get Value from programmatically created components , Iterate over parent component to get child values in ADF Faces

Now this post is about applying ActionListener to a programmatically created button or link
Let's start (Jdev 12.13) -

  • First created a FusionWebApplication and a page in viewController project
  • Dropped a button on page , on this button action i will create a link programmatically and assign actionListener to it
  • To create new link i have added following code (described in previous posts)


  •     /**Method to add dynamically created component to a parent layout
         * @param parentUIComponent
         * @param childUIComponent
         */
        public void addComponent(UIComponent parentUIComponent, UIComponent childUIComponent) {
            parentUIComponent.getChildren().add(childUIComponent);
            AdfFacesContext.getCurrentInstance().addPartialTarget(parentUIComponent);
        }
    

           //Creating Link programmatically on button click     
            RichLink ui = new RichLink();
            ui.setId("li1");
            ui.setText("Programmatically Created Link");
            ui.setInlineStyle("font-weight:bold;");
            //Add this link to parent form layout
     //ParentGroupLayoutBind is the component binding of panelGroupLayout
            addComponent(getParentGroupLayoutBind(), ui);
    

  • After this we are able to create a new Link on click of button, now next is to assign ActionListener to this Link
    For this first i have to define an ActionListener method in bean. So i have added this 

  •     /**Action Listener to be applied on dynamically created button
         * @param actionEvent
         */
        public void actionForProgLink(ActionEvent actionEvent) {
            FacesMessage infoMsg = new FacesMessage("Action Listener Invoked");
            infoMsg.setSeverity(FacesMessage.SEVERITY_INFO);
            FacesContext.getCurrentInstance().addMessage(null, infoMsg);
        }
    

  • Now how to assign this ActionListener to that dynamically created Link?
    See the Code-

  •     /**Method to to resolve actionListener
         * @param actionName
         */
        private ActionListener getActionListener(String actionName) {
            //here Testbean is the name of ManagedBean
            MethodExpression methodExp = getMethodExpressionForAction("#{viewScope.Testbean." + actionName + "}");
            return new MethodExpressionActionListener(methodExp);
        }
    

    Helper method to resolve ActionListener-

        private MethodExpression getMethodExpressionForAction(String actionName) {
            Class[] argtypes = new Class[1];
            argtypes[0] = ActionEvent.class;
    
            FacesContext facesCtx = FacesContext.getCurrentInstance();
            Application app = facesCtx.getApplication();
            ExpressionFactory elFactory = app.getExpressionFactory();
            ELContext elContext = facesCtx.getELContext();
            return elFactory.createMethodExpression(elContext, actionName, null, argtypes);
        }
    

    Just pass the name of method to resolve it

       //Apply ActionListener on this dynamically created link 
        ui.addActionListener(getActionListener("actionForProgLink")); 
     
Now time to check , run application :)
First a button appears-


On click of this button a link is created -

Click on this link- programmatically assigned Action Listener is called

Cheers , Happy Learning :)

Wednesday 6 May 2015

Get Value from programmatically created components , Iterate over parent component to get child values in ADF Faces

Sometimes we need to create and add ADF Faces components at runtime , we can do it programmatically
I have posted about this before
Creating dynamic layout (form and UI Component) using ADF Faces

Now this post talks about getting value from programmatically created component, means when user enters value in those component then how to access that value in managed bean

Here i am using Jdev 12.1.3 , Let's see the implementation part

Created a page and added two buttons , one to create component at run time and second one to get values from those components
See page XML source code -

<af:document title="ProgComponent.jspx" id="d1">
            <af:form id="f1">
                <af:spacer width="10" height="10" id="s3"/>
                <af:button text="Create Components " id="b1"
                           actionListener="#{viewScope.GetValueProgCompBean.createComponentsAction}"/>
                <af:spacer width="10" height="10" id="s1"/>
                <af:button text="Get Value" id="b2"
                           actionListener="#{viewScope.GetValueProgCompBean.getValueOfCompAction}"/>
                <af:panelGroupLayout id="pgl1" layout="vertical"
                                     binding="#{viewScope.GetValueProgCompBean.parentGroupBind}">
                    <af:spacer width="10" height="10" id="s2"/>
                </af:panelGroupLayout>
            </af:form>
        </af:document>

To create components at run time i have used same approach described in above blog post
Check the code written on Create Components button


import javax.faces.component.UIComponent;
import javax.faces.event.ActionEvent;

import oracle.adf.view.rich.component.rich.input.RichInputText;
import oracle.adf.view.rich.component.rich.layout.RichPanelGroupLayout;
import oracle.adf.view.rich.context.AdfFacesContext;


    //Binding of panel group layout , it will be parent of prog. created components
    private RichPanelGroupLayout parentGroupBind;

    public void setParentGroupBind(RichPanelGroupLayout parentGroupBind) {
        this.parentGroupBind = parentGroupBind;
    }

    public RichPanelGroupLayout getParentGroupBind() {
        return parentGroupBind;
    }

    /**Method to add child components to parent
     * @param parentUIComponent
     * @param childUIComponent
     */
    public void addComponent(UIComponent parentUIComponent, UIComponent childUIComponent) {
        parentUIComponent.getChildren().add(childUIComponent);
        AdfFacesContext.getCurrentInstance().addPartialTarget(parentUIComponent);
    }

    /**Method to create Input text at run time
     * @param actionEvent
     */
    public void createComponentsAction(ActionEvent actionEvent) {
        //Create an Object of desired UI Component
        RichInputText ui = new RichInputText();
        //Set properties
        ui.setId("rit1");
        ui.setLabel("Input text 1");
        ui.setContentStyle("font-weight:bold;color:red");
        //Now add this component to any parent component
        addComponent(getParentGroupBind(), ui);

        RichInputText ui1 = new RichInputText();
        ui1.setId("rit2");
        ui1.setLabel("Input text 2");
        ui1.setContentStyle("font-weight:bold;color:red");
        addComponent(getParentGroupBind(), ui1);
    }

Now run application and click on button , you will see two inputText are created


Now to get value of these components follow the steps
1. Get Parent layout
2. Iterate over parent to get all child components
3. Get Value of every child

See the code written on get value button in managed bean

    /**Method to Iterate over parent and get value of all child components
     * @param actionEvent
     */
    public void getValueOfCompAction(ActionEvent actionEvent) {
        RichPanelGroupLayout PF = getParentGroupBind(); // Get Parent Layout
        List<UIComponent> listcomp = PF.getChildren(); // Get all child
        Iterator iter = listcomp.iterator(); // Create an Iteraotr to iterate over childs
        while (iter.hasNext()) {
            UIComponent comp = (UIComponent) iter.next(); // Get next Child Component
            System.out.println("Component is-" + comp + " and value is-" +
                               comp.getAttributes().get("value")); //Get Component detial and it's value
        }
    }

Again check , enter value in both inputText and click on button to get value


Output on console-

Sample ADF Application- Download
Cheers :) Happy Learning

Monday 4 May 2015

ADF Skinning : Change color and style of af:query buttons in ADF Faces (Jdev 12.1.3)

Hello All,

This is another post about ADF Skinning , in this post i am going to show you that how can we change button's style in af:query component
Actually this is very easy , if we define some styles for af:button component in our css file then it will be applicable on af:query's buttons (Search, Reset, Advanced, Save etc) too

Suppose i have defined this in css file

af|button{
    color:navy;
    font-weight:bold;
}
 

Now it will change color of all buttons of application including af:query
See this snap after applying this skin


But if you have a requirement to use different style in af:query buttons or you don't want to change color of all buttons
Then it is not that much easy as it seems

There is a selector to style buttons of af:query - af|query::button 
But this works only if buttons are af:commandButton not af:button
See from docs-

af|query::button Styles the buttons of the query component. Note that this skin selector is only present when the skin selector -tr-button-type is set to 'old', and the query buttons are rendered as af:commandButtons. When the -tr-button-type is set to 'unified', the query buttons are rendered as af:buttons and have the default stylings for af:button applied, so that query buttons have the same look and feel as all other buttons. Tip: If you skin this selector's background-image, you may also want to skin it for :hover, :active, :focus. The :disabled state is currently not supported. Please note that for buttons :active and :focus pseudo-classes do not work in IE7. IE7 also does not allow disabled buttons to be styled. It is recommended that you use the .AFButton*:alias selectors as a shortcut to skin all button components the same.

So for this first i have to change -tr-button-type selector to old so that i can use af|query::button
Now see the css


af|query {
    -tr-button-type: old;
}
 af|query::button {
    color: red;
    font-weight:bold;
}

 af|query::button:hover {
    color: Orange;
    font-weight:bold;
}

 af|query::button:focus {
    color: maroon;
    font-weight:bold;
}

af|button{
    color:navy;
    font-weight:bold;
}

Check the output-

To use specific style for af:query you can create styleClass in css file and put this in styleClass property of af:query
Suppose i have two af:query components on page and i want to use different style for both
For this i have define two different styleClass in css file like this-


af|query {
    -tr-button-type: old;
}
 .mystyle1 af|query::button {
    color: red;
    font-weight:bold;
}

.mystyle2 af|query::button {
    color: darkgreen;
    font-weight:bold;
}

and on page put myStyle1 in styleClass property of first af:query component and myStyle2 in second af:query
See how it looks now -


Cheers, Happy Learning  ☺