Please disable your adblock and script blockers to view this page

Search this blog

Showing posts with label Oracle ADF. Show all posts

Tuesday 23 April 2019

Show Indian Currency Format in ADF using currencyFormatter jQuery

 Previously I have posted about Change af:converNumber format according to Locale but there is no option to show Indian currency format directly using locale so Here I am writing about showing Indian Currency format in ADF components using the currencyFormatter jQuery library.

From the docs

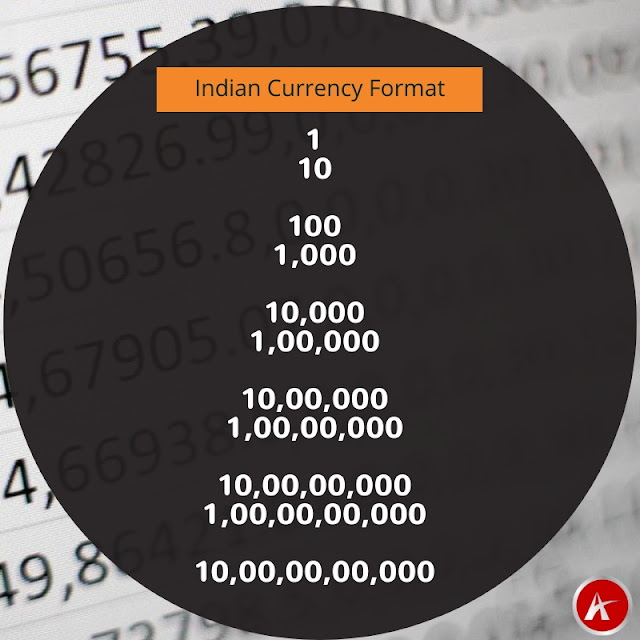
CurrencyFormatter.js allows you to format numbers as currencies. It contains 155 currency definitions and 715 locale definitions out of the box. It handles unusually formatted currencies, such as the INR.

Indian currency format is a bit unusual as it uses variable-width grouping, See the below image to understand how numbers are grouped in INR.


Let's see how to use the currencyFormatter jQuery library in our ADF application. Created an ADF Application and dropped an input text component on the page to enter the amount


Added jQuery library using resource tag under af:document

  1. <af:resource type="javascript"
  2. source="https://cdnjs.cloudflare.com/ajax/libs/jquery/3.1.1/jquery.min.js"/>
  3. <af:resource type="javascript"
  4. source="https://cdnjs.cloudflare.com/ajax/libs/currencyformatter.js/2.2.0/currencyFormatter.js"/>

Here goes the javascript function that formats the amount

  1. <af:resource type="javascript">
  2. function changeFormatInd(evt) {
  3. var val = $('input[name="it2"]').val();
  4. val.replace(/\,/g, "");
  5. var str2 = val.replace(/\,/g, "");
  6. //alert(str2);
  7. $('input[name="it2"]').val(OSREC.CurrencyFormatter.format(str2,
  8. {
  9. currency : 'INR', symbol : ''
  10. }))
  11. }
  12. </af:resource>

Called this function on value change event of input text using client listener

  1. <af:inputText label="Amount" id="it2"
  2. contentStyle="width:300px;padding:8px;font-weight:bold;color:#006394;font-size:30px;">
  3. <af:clientListener method="changeFormatInd" type="valueChange"/>
  4. </af:inputText>

Now run application and check


Cheers 🙂 Happy Learning

Thursday 18 April 2019

Populate Oracle JET table on top of Oracle ADF BC using REST Web Service

 Previously I have posted about creating REST Web Service from ADF Application Module and in this post, I am going to use the same REST service for populating data in a JET table. Here we'll populate JET table on top of Oracle ADF BC (Business Components).

Here I am taking the same sample application that I have discussed in my first post Getting started with Oracle JET and JDeveloper

The URL of ADF BC based web service is http://127.0.0.1:7101/RestWebServApp-RESTWebService-context-root/rest/Jdev12.2.1/Department and it returns a list of Departments in nested JSON format


Let’s see the implementation part

Add an oj-table component in the dashboard.html page and define the required number of columns, this web service returns a list of Departments so I have taken 4 columns for Department Id, Department Name, Manager Id, and Location Id

  1. <div class="oj-hybrid-padding">
  2. <h1>Dashboard Content Area</h1>
  3. <div id="div1">
  4. <oj-table id='table' aria-label='Departments Table'
  5. data='[[datasource]]'
  6. selection-mode='{"row": "multiple", "column": "multiple"}'
  7. dnd='{"reorder": {"columns": "enabled"}}'
  8. scroll-policy='loadMoreOnScroll'
  9. scroll-policy-options='{"fetchSize": 10}'
  10. columns='[{"headerText": "Department Id",
  11. "field": "dept_id",
  12. "resizable": "enabled"},
  13. {"headerText": "Department Name",
  14. "field": "dept_name",
  15. "resizable": "enabled"},
  16. {"headerText": "Manager Id",
  17. "field": "mgr_id",
  18. "resizable": "enabled"},
  19. {"headerText": "Location Id",
  20. "field": "loc_id",
  21. "resizable": "enabled"}
  22. ]'
  23. style='width: 100%; height: 400px;'>
  24. </oj-table>
  25. </div>
  26. </div>

Now see the code of dashboard.js, Read comments to understand the javascript code, Here getJSON() method of jQuery is used to call REST Web Service as jQuery is a part of Oracle JET libraries.

  1. /*
  2. * Your dashboard ViewModel code goes here
  3. */
  4. define(['ojs/ojcore', 'knockout', 'jquery', 'ojs/ojinputtext', 'ojs/ojtable', 'ojs/ojarraytabledatasource'],
  5. function (oj, ko, $) {
  6. function DashboardViewModel() {
  7. var self = this;
  8. //Define a Knockout observable array and name it tabData
  9. self.tabData = ko.observableArray();
  10. //Use jQuery method to call REST Web Service
  11. $.getJSON("http://127.0.0.1:7101/RestWebServApp-RESTWebService-context-root/rest/Jdev12.2.1/Department").
  12. then(function (departments) {
  13. //JSON response is nested that's why 'items' is used to access records
  14. $.each(departments.items, function () {
  15. //Push data in Observable array
  16. self.tabData.push( {
  17. dept_id : this.DepartmentId,
  18. dept_name : this.DepartmentName,
  19. mgr_id : this.ManagerId,
  20. loc_id : this.LocationId
  21. });
  22. });
  23. });
  24. //Pass observable array in utility class to show data in table
  25. self.datasource = new oj.ArrayTableDataSource(self.tabData,
  26. {
  27. idAttribute : 'dept_id'
  28. });
  29. .
  30. .
  31. .

tabData is a knockout observable array that is defined to hold returned value and you can see that
self.tabData.push is used to push web service data into this array and at last a JET utility class
ArrayTableDataSource is used to convert this observable array into tabular format data.

Now run the application and you can see that a JET table is populated with Departments data


Cheers 🙂 Happy Learning