Please disable your adblock and script blockers to view this page

Search this blog

Wednesday 21 November 2012

Shuttle Component in Oracle ADF (Allow Multiple Selection), Get Selected values from Shuttle Component


Hello All

Hope you all are doing well :) 

Shuttle component supports multiple selections at Runtime, when we need to select multiple records at runtime then we can use Shuttle Component.

Now we see how to use shuttle component (af:selectManyShuttle) in Oracle ADF

Shuttle Component in Oracle ADF

Follow these steps-

  • Prepare model for Employees table of HR Schema(Create EO,VO and AM)
  • Now drag Employees ViewObject from DataControl to page and select multiple selection-->ADF Select Many Shuttle-
Drop ViewObject as ADF Select Many Shuttle


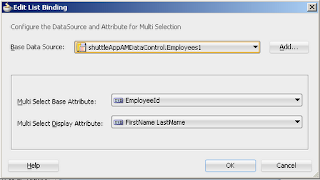
  • Now edit binding for this Shuttle Component, choose attribute that you want to show and also base attribute-
    Edit Shuttle binding and select base and display attribute

     
  • Now it will look like this, drag a button to get selected attribute of this shuttle component
    af:selectManyShuttle
     
    Now write code on button's actionEvent to get selected value from Shuttle-


    import oracle.adf.model.BindingContext;
    import oracle.binding.BindingContainer;
    
        /*****Generic Method to get BindingContainer of current page, fragment or region**/
        public BindingContainer getBindingsCont() {
            return BindingContext.getCurrent().getCurrentBindingsEntry();
        }
    

     public void getSelectedValue(ActionEvent actionEvent) {
          //Get Binding Continer of Page
            BindingContainer bc = this.getBindingsCont();
         //Get shuttle binding from pagedef
            JUCtrlListBinding listBindings = (JUCtrlListBinding)bc.get("Employees1");
        //Get Selected Values
            Object str[] = listBindings.getSelectedValues();
        //Iterate over selected values
            for (int i = 0; i < str.length; i++) {
                System.out.println(str[i]);
            }
        }
    

    When you run this it should look like this and your Shuttle is ready
    Get selected value of shuttle component ADF

Custom Validator in Oracle ADF (JSF Validator), Email Validation Using Regex

Validation is very important part of any programming language, when we visit any website's registration form it says "This field is mandatory" or "Email id is not valid","Password doesn't match", these all are validations

What is a Validator-
A computer program or piece of code that checks syntax or value of any field according to a predefined condition is called Validator
Validators are used in every programming/scripting language.

How to Use Custom Validator in ADF Forms-
This is not complex to use validator in ADF forms, means in .jsff or in .jspx pages. Suppose we have a field of EmailId on form and we want to add custom email id validator on this field

To add validator in a field follow these steps

  • Select the field in Form
af:inputText to enter email id

  •  Now go to property inspector and Select Validator,it is empty by default
Create Validator method in managed bean
  • Now click on Validator edit in property inspector and create a validator in ManagedBean of taskflow


  • It will look like this- Default Custom Validator 
This validator method validates value of inputText

  •  Now we will add custom code to validate EmailId field in this validator

  1.     public void emailValidator(FacesContext facesContext, UIComponent uIComponent, Object object) {
  2.         if(object!=null){
  3.             String name=object.toString();
  4.             String expression="^[_A-Za-z0-9-]+(\\.[_A-Za-z0-9-]+)*@[A-Za-z0-9]+(\\.[A-Za-z0-9]+)*(\\.[A-Za-z]{2,})$";
  5.             CharSequence inputStr=name;
  6.             Pattern pattern=Pattern.compile(expression);
  7.             Matcher matcher=pattern.matcher(inputStr);
  8.             String msg="Email is not in Proper Format";
  9.             if(matcher.matches()){
  10.                
  11.             }
  12.             else{
  13.                 throw new ValidatorException(new FacesMessage(FacesMessage.SEVERITY_ERROR,msg,null));
  14.             }
  15.         }
  16.     }

  • Now when we run this page, we can see validation
Regex to check Email Id format and in case of failure it show validation message

Saturday 3 November 2012

PopUp component in Oracle ADF, Use showPopUpBehavior/JavaScript to show PopUp

In this tutorial we will see that how to deal with PopUp component in Oracle ADF.
Suppose we want to show popUp on any button click or on any other action, then there is 2 way to do this.

First one is-

1. Drag a PopUp component on page from Component Pallette

Popup component in Oracle ADF


2. Now Drag a Button on page and drag af:showPopupBehavior under the button

af:showPopupBehavior to show popup

3.Select af:showPopupBehavior at page structure and go to property Inspector and pass tha popUp id and trigger type of Popup that you want to show on button click.

Set popup id in showPopupBehavior that you want to open  
5. Now run your page and click on Button and you will able to see Popup
Second One is-


In this you have to do some code in Managed Bean, you have to call a method on button click to show Popup

Method to show Popup-


    private void showPopup(RichPopup pop, boolean visible) {
        try {
            FacesContext context = FacesContext.getCurrentInstance();
            if (context != null && pop != null) {
                String popupId = pop.getClientId(context);
                if (popupId != null) {
                    StringBuilder script = new StringBuilder();
                    script.append("var popup = AdfPage.PAGE.findComponent('").append(popupId).append("'); ");
                    if (visible) {
                        script.append("if (!popup.isPopupVisible()) { ").append("popup.show();}");
                    } else {
                        script.append("if (popup.isPopupVisible()) { ").append("popup.hide();}");
                    }
                    ExtendedRenderKitService erks =
                        Service.getService(context.getRenderKit(), ExtendedRenderKitService.class);
                    erks.addScript(context, script.toString());
                }
            }
        } catch (Exception e) {
            throw new RuntimeException(e);
        }
    }


Now we call it on button click, and pass the binding of Popup in it
as we have Popup with binding AddPop then on Button click we call this method as

  1. showPopup(Addpop, true);

Thursday 1 November 2012

Java Code to on off Capslock,Numlock and Scrolllock

This javacode make your capslock,numlock and scroll-lock on, and using infinite loop you can make it to behave like virus. That will continuously make your locks on off.
Go with this code


  1. /*Code by http://www.javacup.co.in
  2.  * Ashish Awasthi
  3.  * */
  4. package practiceJava;
  5. import java.awt.Toolkit;
  6. import java.awt.event.KeyEvent;
  7. public class LockOn {
  8.     //This code show you how to on Capslock,Numlock and ScrollLock using JavaCode
  9.     //Using this you can also use many other keys of Keyboard in Java
  10.     public boolean capsLock(boolean cp) {
  11.         Toolkit tk = Toolkit.getDefaultToolkit();
  12.         tk.setLockingKeyState(KeyEvent.VK_CAPS_LOCK, cp);
  13.         return true;
  14.     }
  15.     public boolean numLock(boolean np) {
  16.         Toolkit tk = Toolkit.getDefaultToolkit();
  17.         tk.setLockingKeyState(KeyEvent.VK_NUM_LOCK, np);
  18.         return true;
  19.     }
  20.     public boolean scrollLock(boolean sp) {
  21.         Toolkit tk = Toolkit.getDefaultToolkit();
  22.         tk.setLockingKeyState(KeyEvent.VK_SCROLL_LOCK, sp);
  23.         return true;
  24.     }
  25. //This method on all three buttons
  26.     public boolean onAllKeys() {
  27.         return capsLock(true) & numLock(true) & scrollLock(true);
  28.     }
  29.     //This method off all three buttons
  30.     public boolean offAllKeys() {
  31.         return capsLock(false) & numLock(false) & scrollLock(false);
  32.     }
  33.     public static void main(String[] args) {
  34.         LockOn lc = new LockOn();
  35.         //this is an infinite loop that will make all 3 buttons contineous on-off
  36.         int i = 0;
  37.         while (i < 1) {
  38.             lc.onAllKeys();
  39.             lc.offAllKeys();
  40.         }
  41.     }
  42. }

Wednesday 31 October 2012

Passing parameter in XML Resource and Use it in Managed Bean, Using parameterised Resource Bundle in ADF

If we are developing an Fusion Web application and we are thinking about Multilingual application , then the best option i came to know is to use Resource Bundle properties of ADF . When we use resource bundle we have to use labels of Fields and Validation message or any kind of other custom message from a XML file as Resource.xml.
So first you should know that how to configure resource bundle in an ADF Application and there are plenty of posts about configuring Properties or List ResourceBundle.

In this post i will show you that how to pass parameter in XML or how to use Parametrized resource .

Suppose i  have a xml file for ResourceBundle reference Resource.xml--

  1. <?xml version="1.0" encoding="windows-1252" ?>
  2. <bundle>
  3. <label>
  4.     <key>MessageCheck</key>
  5.     <value>Only %s %s %s %s %s allowed</value>
  6.  </label>
  7. </bundle>

and now i use it in managed bean to show a custom message and replace its parameters %s with any desired value then we code like this


  1. //To get String from XML key, resolvElDC is a method to resolve expression language
  2. String message = resolvElDC("#{bundle['MessageCheck']}").toString();
  3. //here replace parameter(%s) in string message with your values
  4. String saveMsg = message.format(message, ",", "/", "@", "_", "%");
  5. //Show FacesMessage
  6. FacesMessage msg = new FacesMessage(saveMsg);
  7. msg.setSeverity(FacesMessage.SEVERITY_INFO);
  8. FacesContext ctx = FacesContext.getCurrentInstance();
  9. ctx.addMessage(null, msg);
  10. // Code for resolvElDC method
  11. public Object resolvElDC(String data) {
  12.     FacesContext fc = FacesContext.getCurrentInstance();
  13.     Application app = fc.getApplication();
  14.     ExpressionFactory elFactory = app.getExpressionFactory();
  15.     ELContext elContext = fc.getELContext();
  16.     ValueExpression valueExp = elFactory.createValueExpression(elContext, data, Object.class);
  17.     return valueExp.getValue(elContext);
  18. }

Now run your code and see the updated message- Only %s %s %s %s%s allowed is now
 
FacesMessage Oracle ADF