Please disable your adblock and script blockers to view this page

Search this blog

Showing posts with label ADF Bindings. Show all posts

Saturday 16 March 2019

Send WhatsApp messages from Oracle ADF Application

 Hello Everyone

In this post, I am sharing a method to send WhatsApp messages from Oracle ADF Application using the "WhatsApp Click to Chat" feature as WhatsApp doesn't provide any official API.

Though it's an extremely simple way and we need not write a single line of code, We just need to pass some values in an URL to open WhatsApp Click to Chat console.

Created an ADF Application and a page in the view controller with two text fields and a button in it. It looks like this


and both fields are bonded to the managed bean variables

  1. <af:inputText label="Mobile No." id="it1" value="#{viewScope.SendWhatsAppBean.mobileNo}"
  2. autoSubmit="true"/>
  3. <af:inputText label="Message" id="it2" rows="2" value="#{viewScope.SendWhatsAppBean.message}"
  4. autoSubmit="true"/>

and managed bean just contain simple POJO variables

  1. package sendwhatsappadf.view.bean;
  2. public class SendWhatsAppBean {
  3. public SendWhatsAppBean() {
  4. }
  5. private String mobileNo;
  6. private String message;
  7. public void setMobileNo(String mobileNo) {
  8. this.mobileNo = mobileNo;
  9. }
  10. public String getMobileNo() {
  11. return mobileNo;
  12. }
  13. public void setMessage(String message) {
  14. this.message = message;
  15. }
  16. public String getMessage() {
  17. return message;
  18. }
  19. }

Next is to know about the browser-based WhatsApp click to chat feature, It makes use of an API URL

https://api.whatsapp.com/send?phone=&text=

Now on button click, we can pass phone number and text message in this URL to open click to chat console and in ADF we can do this using destination property of af:button.

  1. <af:button text="Send" id="b1" targetFrame="_blank"
  2. destination="https://api.whatsapp.com/send?phone=#{viewScope.SendWhatsAppBean.mobileNo}&amp;text=#{viewScope.SendWhatsAppBean.message}"
  3. partialTriggers="it2 it1"/>

In the above XML source, we can see that both values are passed from managed bean variables.

Now run and check the application. Enter mobile no., text message on the page

On click of the Send button, WhatsApp click to chat console is opened in a new browser window.


and this button will open the WhatsApp QR code scanner window, In that window scan QR code with your phone and start sending messages.


Using this method we can pass values from ADF bindings to WhatsApp URL and send messages from ADF application.

Cheers 🙂 Happy Learning

Monday 13 November 2017

ADF Basics: Add the row at the end of ViewObject's current RowSet in ADF


This post is about adding a row at the end of current rowset of viewObject without using table or any other UI components binding


Here I have a Department ViewObject (HR Schema), dropped as a table on page and a button to add new row, this button calls a method from model using binding layer 

Tuesday 11 October 2016

OTN Appreciation Day: Oracle ADF Bindings #ThanksOTN

Hello Everyone

I am late still I thought to write about Oracle ADF Bindings for OTN Appreciation Day

ADF binding layer works as glue between Model and View layer, Values from model propagates to page through Binding layer

UI Components are associated with business logic through this layer , this reduce lots of developer effort , it maintains row state , fetching mechanism etc.
Binding definition of components are defined in a XML file called page definition, Model layer uses this file to instantiate the page's bindings

Thursday 28 August 2014

Create taskFlow and region binding at run-time , show n numbers of regions using multiTaskFlow- Oracle ADF

This is very specific development requirement to create taskFlow and region binding at run-time to show n numbers of region in page
In this case initially you don't know how much regions required in page as it depends on user activity .

you can see in http://irctc.co.in/ (Indian Railways) site
when user search for a train and check berth availability then a tab is generated at run-time with berth and fare details and it continues for each action , every time a new tab with new information is generated (n- number of tab and taskFlow)

A very good article is published in Oracle Magazine (July – August 2014) by Frank Nimphius on this requirement , article contains very good description of each and every step and a sample application with whole functionality
I found it very interesting and good so giving a quick overview of TaskFlow on Fly

this functionality is implemented using multiTaskFlow element that uses taskFlow binding from managed bean , taskFlow bindings in managed bean created using TaskFlowBindingAttributes
this class is used to set all properties of taskFlow binding at runtime


See Oracle docs (TaskFlowBindingAttributes)-
Set of attributes that define a TaskFlowBinding object. The taskFlowList attribute of the multiTaskFlow element of the page definition uses a list of object of this type to describe each taskflowBinding that the multiTaskflow binding contains. The order of this list defines the order of the region objects in the multiTaskflow binding. 

So in this post i am using Departments and Employees table of HR Schema(Oracle) to create business components for Model part


Create viewCriteria in both viewObjects (Departments and Employees) to filter data using DepartmentId


Applied viewCriteria to viewObject at AM level (Edit Vo instance and shuttle viewCriteria to selected side)
After this created methods in AMImpl class to set value in both viewCriteria's bind variables


    /**Method to filter Department ViewObject
     * @param deptId
     */
    public void filterDepartmentData(Integer deptId) {
        this.getDepartments1().setNamedWhereClauseParam("BindDeptId", deptId);
        this.getDepartments1().executeQuery();

    }

    /**Method to filter Employees Data
     * @param deptId
     */
    public void filterEmployeesData(Integer deptId) {
        this.getEmployees1().setNamedWhereClauseParam("BindDeptId", deptId);
        this.getEmployees1().executeQuery();

    }

Expose both methods to use in clientInterface

Now viewController part-

Created two bounded taskFlow with one input parameter for DepartmentId (this id will be used to filter Departments and Employess viewObject)
One for Departments and Second for Employees-

First taskFlow has a .jsff (facelets) page that has Departments viewObject as a form , just to show date with navigation buttons
filterDepartmentData method of AMImpl is used as Default Activity of this taskFlow
to filter data before entering in page


Second taskFlow has a .jsff (facelets) page that has Employees viewObject as a table
filterEmployeesData method of AMImpl is used as Default Activity of this taskFlow
to filter data before entering in page


Now basic configuration is complete, model is ready and bounded taskFlows are ready
then create a jsf page and manged bean (pageFlowScope) in adfc-config.xml, this page will make use of these two bounded taskFlows  and managed bean is responsible to generate taskFlow binding at runtime

Next Step is to prepare manged bean to hold taskFlowBinding-
Create a List of type TaskFlowBindingAttributes and it's accessors


import oracle.adf.controller.binding.TaskFlowBindingAttributes;    
private List<TaskFlowBindingAttributes> taskFlowBinding = new ArrayList<TaskFlowBindingAttributes>(5);

    public void setTaskFlowBinding(List<TaskFlowBindingAttributes> taskFlowBinding) {
        this.taskFlowBinding = taskFlowBinding;
    }

    public List<TaskFlowBindingAttributes> getTaskFlowBinding() {
        return taskFlowBinding;
    }

Create multiTaskFlow binding in executables of pgae-

  • Open jsf page, click on bindings tab of page editor
  • click on green plus icon of executables section
  • Select ADF TaskFlow Bindings in category and select multiTaskFlow


  • click on ok and provide an unique value for id attribute and reference of List created in managed bean as value for taskFlowList attribute


  • Configuration of  multiTaskFlow for this page is complete and now time to design page to render multiple regions. For this purpose add af:ForEach and a region inside it, forEach is responsible to add regions at run-time. here a little change i am using panelTabbed  to create tab at runtime and inside tab there will be region 
  • See this xml code- here nothing simple panelTabbed and forEach iterates over to list to identify number of items and varStatus of forEach is used to create id of showDetailItem at runtime as id must be unique. regionModel is referenced from var attributes of forEach as part of taskFlowBinding 

  •  <af:panelTabbed position="above" id="pt1" partialTriggers="b1">
                <af:forEach items="#{bindings.mtf1.taskFlowBindingList}" var="multiTF" varStatus="vs">
                   <af:showDetailItem id="Tab#{vs.index+1}" text="#{multiTF.name}" partialTriggers="b1">
                      <af:region value="#{multiTF.regionModel}" id="r1#{vs.index}" partialTriggers="::b1"/>
                   </af:showDetailItem>
                </af:forEach>
             </af:panelTabbed>
    

  • Now page is ready to show unknown (n) number of regions, here i am using two list and a button on page First List is of all departments and second one is static list to select information type (if user want to see Only Departments or Departments Wise Employees) and button to execute and add taskFlow from managed bean as per selected Department and 
  • Again a map is created in managed bean to store input parameters for taskFlow and it will used while setting and creating taskFlowBinding

  •     HashMap<String, Object> tfParam = new HashMap<String, Object>();
        public void setTfParam(HashMap<String, Object> tfParam) {
            this.tfParam = tfParam;
        }
    
        public HashMap<String, Object> getTfParam() {
            return tfParam;
        }
    

  • finally we will create taskFlow binding and set properties on button click (actionEvent of button), See this code-

  •     /**Method to create and set properties in TaskFlowBinding
         * @param actionEvent
         */
        public void displayDepartmentAction(ActionEvent actionEvent) {
            //Clear List to show newly created regions only
            taskFlowBinding.clear();
            System.out.println("List Cleared -Size>" + taskFlowBinding.size());
            //Check that user selects value in both List (Uses component binding to check)
            if (deptIdBindVal.getValue() != null && showTypeBind.getValue() != null) {
                //Put value in TaskFLow Parameter map, deptIdBindVal is binding of list of departments on page
                tfParam.put("DeptIdParam", deptIdBindVal.getValue());
    
                //Only Shows Departments taskFlow, if user selectes "Only Departments"
                if ("Only Departments".equalsIgnoreCase(showTypeBind.getValue().toString())) {
                    //Setting taskFlow properties
                    TaskFlowBindingAttributes tfAttr = new TaskFlowBindingAttributes();
                    //Creating Unique Id
                    tfAttr.setId("Department_" + deptIdBindVal.getValue());
                    //See bounded taskFlow name in WEB-INF and use here
                    tfAttr.setTaskFlowId(new TaskFlowId("/WEB-INF/DepartmentsBTF.xml", "DepartmentsBTF"));
                    //This EL refers parameter map created in this managedBean
                    tfAttr.setParametersMap("#{pageFlowScope.MultiTaskFlowBean.tfParam}");
                    //Finally add taskFlow to List
                    taskFlowBinding.add(tfAttr);
                } else { // Show both Departments and Employees
                    //Creating Departments TaskFlow binding
                    TaskFlowBindingAttributes tfAttr = new TaskFlowBindingAttributes();
                    tfAttr.setId("Department_" + deptIdBindVal.getValue());
                    tfAttr.setTaskFlowId(new TaskFlowId("/WEB-INF/DepartmentsBTF.xml", "DepartmentsBTF"));
                    tfAttr.setParametersMap("#{pageFlowScope.MultiTaskFlowBean.tfParam}");
                    taskFlowBinding.add(tfAttr);
                    //Creating Employee TaskFlow biniding
                    tfAttr = new TaskFlowBindingAttributes();
                    tfAttr.setId("Employees_" + deptIdBindVal.getValue());
                    tfAttr.setTaskFlowId(new TaskFlowId("/WEB-INF/EmployeesBTF.xml", "EmployeesBTF"));
                    tfAttr.setParametersMap("#{pageFlowScope.MultiTaskFlowBean.tfParam}");
                    taskFlowBinding.add(tfAttr);
                }
            }
        }
    

  • So Application with multiTaskFlow is ready , in this post i have used these two bounded taskFlow to show in two tabs at run-time, in same way you can call multiple TFs or a single taskFlow multiple time. Now runt application and see how it works

Initial page with two lists


Select Department and show type -click on button


Select Department and show type -click on button


  • Refer this post Region Extreme: Multi-Task-Flow Binding to learn more about multiTaskFlow binding. In this Frank also told about how to use dynamic viewObject instance to show different data at run-time, because if we use same instance of viewObject in multiple taskFlow at same time then it will not maintain state for each region to it is necessary to use dynamic instance and it's binding in pageDef
  • Read more about regions and taskFlows- Using Task Flows as Regions
Thanks - Happy Learning :) Sample ADF Application

Tuesday 14 May 2013

Using Contextual Event in Oracle ADF (Region Communication)

Contextual event ,in simple terms is a way to communicate between taskflows.
Sometimes we have taskflow open in a region and have to get some values from that taskflow .
This scenario can be achieved by contextual event.

 
Contextual Event have two parts-
  1. Publisher Event (Producer)- As button or any component that can raise event 
  2. Handler Event (Customer)- that listens and process event published by producer
This tutorial is based on example developed on default HR schema of Oracle DB 11g
I have created two application and called first one in secod application as region.
  • Create first application using Department table of HR schema and drag Department Name on page fragment, now create publisher event (follow steps) for Department Name .
  • Select Department Name field in structure window and go to property Inspector select ContextualEvent
    click on green add icon and select event type and name for publisher event

  • Select field value from Iterator Binding
  • here you are done with publisher event or producer create a jar of this application in order to use it in second application.
  • Now start Second Application that will handle and process this event, create a page and put an output text and set its value from managed bean


  • Now create a event handler class to process published event and to make it available to page binding level , we have to create DataControl for this class.


  • Right click on event class and Click on CreateDataControl.
  • Now add this method binding to page so that it can be accessible from page binding
  • Now drag and drop taskflow from jar library on page as region by this published event will also be available to page
  • Now go to page binding and goto ContextualEvents tab ,click on subscribers tab and click on add icon this will open a popup window ,click on search button , it will show available publisher event, now select event and goto handler search option and select function that you have previously added in page binding
  • Give consumer parameter name same as event handler function

Now Run your Application - Download ADF Sample Application

Wednesday 21 November 2012

Shuttle Component in Oracle ADF (Allow Multiple Selection), Get Selected values from Shuttle Component


Hello All

Hope you all are doing well :) 

Shuttle component supports multiple selections at Runtime, when we need to select multiple records at runtime then we can use Shuttle Component.

Now we see how to use shuttle component (af:selectManyShuttle) in Oracle ADF

Shuttle Component in Oracle ADF

Follow these steps-

  • Prepare model for Employees table of HR Schema(Create EO,VO and AM)
  • Now drag Employees ViewObject from DataControl to page and select multiple selection-->ADF Select Many Shuttle-
Drop ViewObject as ADF Select Many Shuttle


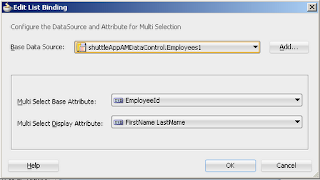
  • Now edit binding for this Shuttle Component, choose attribute that you want to show and also base attribute-
    Edit Shuttle binding and select base and display attribute

     
  • Now it will look like this, drag a button to get selected attribute of this shuttle component
    af:selectManyShuttle
     
    Now write code on button's actionEvent to get selected value from Shuttle-


    import oracle.adf.model.BindingContext;
    import oracle.binding.BindingContainer;
    
        /*****Generic Method to get BindingContainer of current page, fragment or region**/
        public BindingContainer getBindingsCont() {
            return BindingContext.getCurrent().getCurrentBindingsEntry();
        }
    

     public void getSelectedValue(ActionEvent actionEvent) {
          //Get Binding Continer of Page
            BindingContainer bc = this.getBindingsCont();
         //Get shuttle binding from pagedef
            JUCtrlListBinding listBindings = (JUCtrlListBinding)bc.get("Employees1");
        //Get Selected Values
            Object str[] = listBindings.getSelectedValues();
        //Iterate over selected values
            for (int i = 0; i < str.length; i++) {
                System.out.println(str[i]);
            }
        }
    

    When you run this it should look like this and your Shuttle is ready
    Get selected value of shuttle component ADF

Thursday 25 October 2012

Set on Current row after Rollback Execute or page refresh

Some times we edit a table in form and Save(Commit & Execute) or Cancel(Rollback & Execute)  and table refreshed to its first record means focus is now on first row of table.
And we need the same row again, then we search it and perform another operation, this is really disgusting behavior of table for Developer.

To set on previously selected row after execute we can use this code,
in this scenario we have to get current row key from its IteratorBinding and after Execute we can set it again to show that row as selected.


    /**
     * Generic Method to call operation binding
     **/
     public BindingContainer getBindings() {
      return BindingContext.getCurrent().getCurrentBindingsEntry();
     }


     BindingContainer bindings = getBindings();
     //Get Iterator of table
     DCIteratorBinding parentIter = (DCIteratorBinding)bindings.get("IteratorName");
     //Get current row key
     Key parentKey = parentIter.getCurrentRow().getKey();

     //You can add your operation code here, i have used simple Cancel operation 
     //with Rollback and Execute
     
     
     OperationBinding ob= bindings.getOperationBinding("Rollback");
     ob.execute();
     OperationBinding ob1= bindings.getOperationBinding("Execute");
     ob1.execute();
    
     //Set again row key as current row
     parentIter.setCurrentRowWithKey(parentKey.toStringFormat(true));