Please disable your adblock and script blockers to view this page

Search this blog

Sunday, 15 March 2015

Disable(Override) browser back button functionality in ADF Application using JavaScript

This is another JavaScript trick to disable browser back button functionality
In this example i am using two jspx pages - Page1 and Page2


Added two buttons in both pages to navigate between pages


Source of Page1-

<af:outputText value="Page 1" id="ot1" inlineStyle="font-size:medium;font-weight:bold;"/>
                <af:commandButton text="Go To Second Page" id="cb1" action="forward"/>


Source of Page2-


 <af:outputText value="Page 2" id="ot1" inlineStyle="font-size:medium;font-weight:bold;"/>
                <af:commandButton text="Go To First Page" id="cb1" action="backward"/>


Now see JavaScript function to disable back button functionality, In actual JavaScript doesn't disable back button but override it's default functionality
This function forces browser to navigate forward instead of going back so on click of back button first browser executes it's default back operation but due to this function again navigates to forward and show same page


function preventBackButton() {
                  window.history.forward();
              }

Add this javascript to Page 1 and invoke using af:clientListener tag on pageLoad


<af:clientListener method="preventBackButton" type="load"/>

Now run application and check
Go to second page and the press back button - it returns to page one for a fraction of second but again navigates to Page 2
It means it is working , Cheers :) Happy Learning

Monday, 16 February 2015

Working with af:iterator and af:forEach programmatically (Add and delete records using List)

In previous post Working with af:iterator and af:forEach programmatically (Populate values using POJO from Managed Bean) we saw that how can we populate record from a List to af:iterator and af:forEach (ADF Faces Component)

So this post is about adding and deleting of records from List while List is presented using af:iterator.
here i am extending previous post and using same sample application


Added two fields and button on page to add records 


<af:panelFormLayout id="pfl1" rows="1">
                    <af:inputText label="Name" id="it1" binding="#{viewScope.PopulateIteratorBean.nameBind}"/>
                    <af:inputText label="Department" id="it2" binding="#{viewScope.PopulateIteratorBean.deptNameBind}"/>
                    <af:button text="Add" id="b1"
                               actionListener="#{viewScope.PopulateIteratorBean.addNewRecordAction}"/>
                </af:panelFormLayout>


and on this button action simply added both attributes to List and added partial trigger of button to af:iterator to refresh it


    // Component binding to access inputValue from page
    
    private RichInputText nameBind;
    private RichInputText deptNameBind;
    
    public void setNameBind(RichInputText nameBind) {
        this.nameBind = nameBind;
    }

    public RichInputText getNameBind() {
        return nameBind;
    }

    public void setDeptNameBind(RichInputText deptNameBind) {
        this.deptNameBind = deptNameBind;
    }

    public RichInputText getDeptNameBind() {
        return deptNameBind;
    }

    /**Method to add record in List and show on page using af:iterator and af:forEach
     * @param actionEvent
     */
    public void addNewRecordAction(ActionEvent actionEvent) {
        if (nameBind.getValue() != null && deptNameBind.getValue() != null) {
            EmployeeDet obj = new EmployeeDet(nameBind.getValue().toString(), deptNameBind.getValue().toString());
            employeeDetail.add(obj);
            
        }
    }


On page - add a new record (record added in List and appeared in iterator as well)


So it is quite simple to add records but deletion of record is a bit tricky but not difficult at all :)
Let's see this-
For deleting record i have added a delete link inside iterator so that it should appear for each record as you can see in snap (above)
Here question is that how to know that which record should be deleted  ?

So for this i have added a f:attribute tag to link , this attribute contains the value of current item of iterator


f:attribute derives it's value from var of af:iterator/af:forEach, this var represents each item of List
Now on delete button's action - get the current item and remove it from List


    /**Method to delete selected record
     * @param actionEvent
     */
    public void deleteRecordAction(ActionEvent actionEvent) {
        //Get value from f:attribute (current item)
       Object itemVal= actionEvent.getComponent().getAttributes().get("itemVal");
       //Remove selected item from List
       employeeDetail.remove(itemVal);
    }

After deleting records

Sample ADF Application- Download

Tuesday, 10 February 2015

Working with af:iterator and af:forEach programmatically (Populate values using POJO from Managed Bean)


This is another post about Working programmatically with ADF (populating af:iterator and af:forEach programmatically )

Previously i have posted about populating af:iterator and af:forEach using ADF BC and binding layer to show master-detail relation
Implementing master/detail tree relation using af:Iterator and af:forEach for better UI designs - Oracle ADF

For this post i am populating employee name and it's department name using List datastructure ,to get and set value of attributes

Created a java bean class , it has 2 variable for both attributes


public class EmployeeDet {
    public EmployeeDet(String name, String deptName) {
        this.name = name;
        this.deptName = deptName;
    }
    //Attribute to display EmployeeName and Department Name
    private String name;
    private String deptName;

    public void setName(String name) {
        this.name = name;
    }

    public String getName() {
        return name;
    }

    public void setDeptName(String deptName) {
        this.deptName = deptName;
    }

    public String getDeptName() {
        return deptName;
    }
}

Next step is to create a managed bean to populate data in af:iterator and af:forEach , this managed bean makes use of
EmployeeDet 
java bean class to add data in same format for all items of iterator and forEach. A List data structure is used to pass all values to iterator. See code of managed bean 


    //Constructor-populate default records
    public PopulateIteratorBean() {

        EmployeeDet obj = new EmployeeDet("Ashish Awasthi", "Oracle ADF");
        employeeDetail.add(obj);
        obj = new EmployeeDet("Alex Smith", "Java");
        employeeDetail.add(obj);
        obj = new EmployeeDet("James S", "PHP");
        employeeDetail.add(obj);
    }
    //ArrayList to poplate data in af:iterator and af:forEach
    private List<EmployeeDet> employeeDetail = new ArrayList();

    public void setEmployeeDetail(List<EmployeeDet> employeeDetail) {
        this.employeeDetail = employeeDetail;
    }

    public List<EmployeeDet> getEmployeeDetail() {

        return employeeDetail;
    }

Now drop af:iterator on page and set it's properties like value, var etc


using var reference of iterator , set value in output text to show Employee Name and DepartmentName , see XML source of af:iterator


<af:panelGroupLayout id="pgl1" layout="horizontal">
                        <af:iterator id="i1" value="#{viewScope.PopulateIteratorBean.employeeDetail}" var="item">
                            <af:panelBox id="pb2" showDisclosure="false">
                                <f:facet name="toolbar"/>
                                <af:panelGroupLayout id="pgl3" layout="horizontal">
                                    <af:outputText value="#{item.name}" id="ot1"
                                                   inlineStyle="font-weight:bold; font-size:medium; color:#0572ce;;"/>
                                    <af:spacer width="2" height="0" id="s1"/>
                                    <af:outputText value="(#{item.deptName})" id="ot2"
                                                   inlineStyle="font-weight:bold;font-size:small;color:red;"/>
                                </af:panelGroupLayout>
                            </af:panelBox>
                        </af:iterator>
                    </af:panelGroupLayout>  

on running it looks like this-


do same for af:forEach


<af:panelGroupLayout id="pgl2" layout="horizontal">
                        <af:forEach items="#{viewScope.PopulateIteratorBean.employeeDetail}" var="feach">
                            <af:showDetailHeader text="#{feach.deptName}" disclosed="true" id="sdh1">
                                <af:outputText value="#{feach.name}" id="ot3"
                                               inlineStyle="font-weight:bold; font-size:medium; color:#0572ce;;"/>
                            </af:showDetailHeader>
                        </af:forEach>
                    </af:panelGroupLayout>

on running it looks like this-
 Sample ADF Application-Download
Thanks, Happy Learning :)

Monday, 9 February 2015

Custom selection listener for af:listView, Invoke selectionListener programmatically

In the last post (Better UI for data collection using af:listView, Enable selection in ADF Faces List component ) about af:listView, we saw that how can we present data collection in a better way using af:listView and enable selection using EL (same as used for af:table)

Now in this post i will describe about defining custom selection listener for af:listView
Suppose you have to do some task on selection of an item in list other than making it current row, for this you have to override default selection listener and define own custom selection listener in managed bean
So next step is to define a method in managed bean for handling selection event of af:list view


  • Select af:listView, goto properties and click on edit menu of selectionListener property and create a method in managed bean


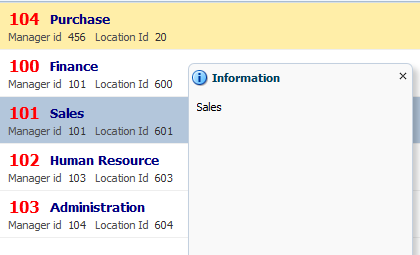
  • now see what we have to do in custom selection listener, first invoke default selection listener EL (#{bindings.Departments1.collectionModel.makeCurrent}) to make selected row as current and then get current row from iterator as selected row is now current row
    See the managed bean code -

  • //Import these packages
    
    import javax.el.ELContext;
    import javax.el.ExpressionFactory;
    import javax.el.MethodExpression;
    import javax.el.ValueExpression;
    
    import javax.faces.application.FacesMessage;
    import javax.faces.context.FacesContext;
    
    import oracle.jbo.Row;
    
    import org.apache.myfaces.trinidad.event.SelectionEvent;   
    
    
     /**
         * Programmatic invocation of a method that an EL evaluates to.
         *
         * @param el EL of the method to invoke
         * @param paramTypes Array of Class defining the types of the parameters
         * @param params Array of Object defining the values of the parametrs
         * @return Object that the method returns
         */
        public static Object invokeEL(String el, Class[] paramTypes, Object[] params) {
            FacesContext facesContext = FacesContext.getCurrentInstance();
            ELContext elContext = facesContext.getELContext();
            ExpressionFactory expressionFactory = facesContext.getApplication().getExpressionFactory();
            MethodExpression exp = expressionFactory.createMethodExpression(elContext, el, Object.class, paramTypes);
    
            return exp.invoke(elContext, params);
        }
    
        /**
         * Programmatic evaluation of EL.
         *
         * @param el EL to evaluate
         * @return Result of the evaluation
         */
        public static Object evaluateEL(String el) {
            FacesContext facesContext = FacesContext.getCurrentInstance();
            ELContext elContext = facesContext.getELContext();
            ExpressionFactory expressionFactory = facesContext.getApplication().getExpressionFactory();
            ValueExpression exp = expressionFactory.createValueExpression(elContext, el, Object.class);
    
            return exp.getValue(elContext);
        }
    
        /**Custome Selection Listener for af:listView
         * @param selectionEvent
         */
        public void listSelectionListener(SelectionEvent selectionEvent) {
            //invoke this EL to set selected row as current row, if it is not invoked then first row will be current row
            invokeEL("#{bindings.Departments1.collectionModel.makeCurrent}", new Class[] { SelectionEvent.class }, new Object[] {
                     selectionEvent });
            // get the selected row , by this you can get any attribute of that row
            Row selectedRow = (Row) evaluateEL("#{bindings.Departments1Iterator.currentRow}");
            FacesMessage msg = new FacesMessage(selectedRow.getAttribute("DepartmentName").toString());
            msg.setSeverity(FacesMessage.SEVERITY_INFO);
            FacesContext.getCurrentInstance().addMessage(null, msg);
        }
    

  • Now run application and check

Download Sample ADF Application here
Thanks , Happy Learning :)

Friday, 6 February 2015

Better UI for data collection using af:listView, Enable selection in ADF Faces List component

af:listView is a new component introduced in Jdev 12C to show tabular data (rows of a collection), it uses same configuration as af:table
In this post i will be describing- how to create af:listView using ADF business component and  how we can enable selection in af:listView

Let's start
How to create af:listView using ADF BC-
  • Created a Fusion Web Application and prepared model using Departments table of HR Schema


  • drop Departments viewObject on page from DataControl as ADF List View


    Configuration Wizard for List is opened, set the appropriate layout


    Set the value binding that we want to show on page


    After this we can customize layout on page also, we can change color, style width etc;
    see XML source of af:listView-

    <af:listView value="#{bindings.Departments1.collectionModel}" var="item"
                                 emptyText="#{bindings.Departments1.viewable ? 'No data to display.' : 'Access Denied.'}"
                                 fetchSize="#{bindings.Departments1.rangeSize}" id="lv1">
                        <af:listItem id="li1">
                            <af:panelGroupLayout layout="horizontal" id="pgl1">
                                <f:facet name="separator">
                                    <af:spacer width="10" id="s1"/>
                                </f:facet>
                                <af:outputFormatted value="#{item.bindings.DepartmentId.inputValue}" id="of1"
                                                    inlineStyle="font-weight:bold;font-size:medium;color:red;">
                                    <af:convertNumber groupingUsed="false"
                                                      pattern="#{bindings.Departments1.hints.DepartmentId.format}"/>
                                </af:outputFormatted>
                                <af:outputFormatted value="#{item.bindings.DepartmentName.inputValue}" id="of2"
                                                    inlineStyle="font-weight:bold;font-size:small;color:navy;"/>
                            </af:panelGroupLayout>
                            <af:panelGroupLayout id="pgl2">
                                <af:outputLabel value="Manager id" id="ol1"/>
                                <af:outputFormatted value="#{item.bindings.ManagerId.inputValue}" id="of3">
                                    <af:convertNumber groupingUsed="false"
                                                      pattern="#{bindings.Departments1.hints.ManagerId.format}"/>
                                </af:outputFormatted>
                                <af:spacer width="10" height="10" id="s2"/>
                                <af:outputLabel value="Location Id" id="ol2"/>
                                <af:outputFormatted value="#{item.bindings.LocationId.inputValue}" id="of4">
                                    <af:convertNumber groupingUsed="false"
                                                      pattern="#{bindings.Departments1.hints.LocationId.format}"/>
                                </af:outputFormatted>
                            </af:panelGroupLayout>
                        </af:listItem>
                    </af:listView>


    and how it looks on page- hmmm better than af:table


  • By default adf listView doesn't support selection, you can see Selection property is set to none. it shares same configuration as af:table , you can see that value property is bound to #{bindings.Departments1.collectionModel} and attributes are populated using variable reference of this collection


  • To enable selection just set Selection to single and in selectionListener property of list set #{bindings.Departments1.treeModel.makeCurrent}


  • Now Run this application and check, single selection is enabled
 Thanks, happy learning :)