Please disable your adblock and script blockers to view this page

Search this blog

Showing posts with label Sample ADF Application. Show all posts

Tuesday 7 June 2016

Open af:inputListOfValues popup by calling JavaScript programmatically


af:inputListOfValues provides option to open Lov values in a popup and allow user to search, We can open this popup by clicking on magnifying glass icon


Recently I have seen a thread on OTN forum where user wants to open lov popup on a button click after checking some conditions and also found a post by Frank Nimphius Where he used javascript to open Lov popup on double click of mouse.
So guess what I have done ? ;)
Just called that javascript fucntion programmatically on button click

Friday 20 May 2016

Navigate to another page on value change event of ADF input component

Recently I have seen a thread on OTN forum in that user want to navigate from one page to another on valueChangeListener of input component.

First Method-
This is a simple piece of code to perform navigation to specific page , Use it in ValueChangeListener directly

 FacesContext facesContext = FacesContext.getCurrentInstance();
 facesContext.getApplication().getNavigationHandler().handleNavigation(facesContext, null, "controlFlowName");

Second Method-
ValueChangeListener fires when value of input component changes but it is not meant for navigation, For navigation we use buttons and links with Action property
But for this requirement we have to be a bit tricky, We can queue button Action on value change listener of inputText to navigate to another page
Now first value change listener will be executed and then it'll queue button action to execute and as final outcome user will be able to navigate

Thursday 19 May 2016

Traverse POJO based ADF treeTable, Get Child nodes of selected parent


Previosuly I have posted about populating af:treeTable programmatically and getting selected records from POJO based treeTable

This post is next in that series and here I am extending same sample application that show a tree of Seasons and it's characters
First we will see How to traverse a POJO based treeTable (Iterate through all nodes of treeTable)

Basic idea is to get treeTable Collection Model and iterate over it to get all nodes value, To get CollectionModel created treeTable component binding in managed bean

Monday 16 May 2016

How to queue SelectionEvent programmatically, Call af:table Selection Listener programmatically

Hello All
Hope you all are doing good :) 
Previously I have posted about defining custom selection listener for af:table and perform desired operation on selection event of table row

Selection Listener is fired when server receives a selection event from client means whenever user selects a row in table (Selection Event) then server process that event and execute selection listener defined in managed bean

And this post is about creating selection event programmatically without user interaction with table.
In ADF we can queue ActionEvent , ValueChangeEvent and in same manner we can create and queue SelectionEvent programmatically

Wednesday 24 February 2016

Drag Drop in same table to reorder rows, Update Attribute value to make it persistent

This post is based on Frank's article on reordering table rows using drag drop functionality of ADF Faces, post uses iterator indexing to change order of rows and it works pretty good

Recently i came across a question on OTN forum asking about making this ordering persistent on base of some attribute value so for that we have to maintain a serial no attribute for each row and when user performs Drag n Drop , serial no. will be swapped and updated ordering of rows will be shown to user and it is persistent as updated attribute's value is saved in database

Wednesday 3 February 2016

ADF UI: Using dvt:sunburst to show hierarchical data in ADF

<dvt:sunburst> is one of fancy components to show multi level hierarchical data in form of circular rings in ADF application

It supports drilling up to n-level , consist of dvt:sunburstNode as it's child tag to show level wise detail . Sunburst supports multiple type of animations that makes a better UI
See What docs says -

Sunbursts are used to display hierarchical data across two dimensions, represented by the size and color of the sunburst nodes. The sunburst displays multiple levels of its hierarchy at once, with each ring corresponding to a level of the hierarchy

Thursday 14 January 2016

Consuming a SOAP Web Service quickly using Web Service Data Control (WSDL) in ADF

Creating and Consuming Web Servie is an important part development cycle . In earlier posts i have described about creating SOAP/REST Web Service
Create REST Web Service with Application Module declaratively in ADF 12.2.1
Create SOAP Web Service with Application Module quickly in ADF 12.2.1

Now this post is about consuming a SOAP Web Service. A very simple way to consume Web Service is to create Web Service Data Control (WSDL) for external Web Service URL
Here i am using a Country-Currency Web Service (http://www.webservicex.net/country.asmx) to create WSDL

Wednesday 30 December 2015

Create REST Web Service with Application Module declaratively in ADF 12.2.1

REST stands for Representational State Transfer, REST is an architectural style not a protocol as SOAP that's why it can use any other protocol like SOAP, HTTP etc.
REST requires less bandwidth and resources (lighter) than SOAP

New ADF 12.2.1 supports creating RESTful web services directly from Application Module, In previous versions we have to do everything manually
See- Create RESTful services on top of ADF Business Components

Tuesday 22 December 2015

Create SOAP Web Service with Application Module quickly in ADF 12.2.1


SOAP stands for Simple Object Access Protocol, a protocol to exchange information in XML format between two applications over HTTP. This protocol is used to create ,access and consume web services.

SOA (Service Oriented Architecture) focuses on re-usability and exposing application module as web service makes it's methods and objects accessible from any device , any platform and these methods and objects can be further used by any other application

Monday 19 October 2015

Get domain information (WHOIS) using Apache Commons Net API- ADF & Java

We can get any domain information using Apache commons net library. It supports various protocols and WHOIS information is one of them

WhoisClient class provides access of domain information
See what docs says -

The WhoisClient class implements the client side of the Internet Whois Protocol defined in RFC 954. To query a host you create a WhoisClient instance, connect to the host, query the host, and finally disconnect from the host. If the whois service you want to query is on a non-standard port, connect to the host at that port.

Download required library or if this link doesn't work then goto API page and download from there

This simple java method will fetch information of domain using Apache library

Wednesday 7 October 2015

ADF Basics: Reorder ADF table column using DisplayIndex property

This post is about a very simple use case that is reordering of af:table column at run time. 
Ordering of columns in af:table is controlled by DisplayIndex property of af:column
Check what docs says-

Default Value: -1

The display order index of the column. Columns can be re-arranged and they are displayed in the table based on the displayIndex. Columns are sorted based on the displayIndex property, columns without displayIndex are displayed at the end, in the order in which they appear. The displayIndex attribute is honored only for top level columns, since it is not possible to rearrange a child column outside of the parent column.
Not supported on the following renderkits: org.apache.myfaces.trinidad.core

We can set DisplayIndex property for all columns in a sequence (1,2,3 etc) that we want to see on page

Tuesday 22 September 2015

Using popupFetchListener to execute method on popup launch in Oracle ADF

Everyone must have used ADF Faces popup component , this is one of most used container to show information on top of page
In this post i am talking about popup fetch event suppose we have to perform some operation before opening popup like filtering data inside popup . We can do this by capturing popup fetch event, if you have checked af:popUp documentation then you must have seen concept of popupFetchListener

From Docs-
The PopupFetchEvent is one of two server-side popup events but doesn't have a corresponding client event. The popup fetch event is invoked during content delivery. This means that the event will only queue for popups that have a contentDelivery type of lazy or lazyUncached. Another caveat is that the event will only work when the launch id is set. This is automatically handled by the af:showPopupBehavior but must be provided as a popup hint if programmatically shown.

So here we will see -

How to use popupFetchListener to filter data inside popup ?
How to execute some operation before opening popup ?
How to call AMImpl method before launching popup?

Friday 17 July 2015

Apply sorting to POJO based af:table programmatically , Using custom sort listener in ADF

Again a post about POJO based table , previously i have posted about-

1.Populating and adding records in POJO based table
Populate af:table programmatically from managead bean using POJO
2. Gettting selected rows from POJO based table
Get selected row (single/multiple) from POJO based table in ADF

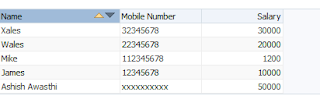
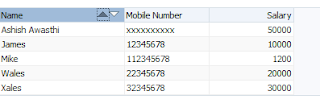
This post is about applying sorting to POJO based table , when we drop a viewObject as af:table on page then framework provides sorting and filtering features declaratively, but when populating table from managed bean using List(POJO) then it is not there so we have to do it manually

To understand this post completely , go through previous posts and check attached application there
I have used a PersonBean java bean class to contain columns of table or you can say there is a List of PersonBean type that populates data in af:table. (This is the basic information about application)


Now what to do , see step by step implementation-
  • Select table on page editor and create a sortListener in managed bean to handle sortEvent


  • Now what we have do in sort listener ?
    1.Get active sort criteria using sortEvent
    2.Remove that sort criteria
    3.Sort List Data Structure that is used to populate af:table
    4.Apply sort criteria again on af:table

    See code written in managed bean-

  •     //List to store sort criteria
        private List<SortCriterion> sortedTableList = new ArrayList<SortCriterion>();
    
        public void setSortedTableList(List<SortCriterion> sortedTableList) {
            this.sortedTableList = sortedTableList;
        }
    
        public List<SortCriterion> getSortedTableList() {
            return sortedTableList;
        }
    
        /**Custom Sort Listener for POJO based af:table
         * @param sortEvent
         */
        public void tableSortListener(SortEvent sortEvent) {
            //Get active sortCriteria on table
            List<SortCriterion> activeSortCriteria = sortEvent.getSortCriteria();
            SortCriterion sc = activeSortCriteria.get(0);
            // Remove active criteria from table
            this.removeSortCriteria(sc);
            //Sort List that populates table using Comparator interface
            applySortAsPerColumn(sc.getProperty());
    
            // Add the current criteria to the list
            this.sortedTableList.add(0, sc);
            // Apply sort criteria to table
            RichTable richTable = (RichTable) sortEvent.getComponent();
            richTable.setSortCriteria(sortedTableList);
    
        }
    
        /**Removes sort criteria*/
        private boolean removeSortCriteria(SortCriterion sortCriterion) {
            //Checks that if any sortCirteria is present in list , if yes then remove it
            if (sortedTableList != null && sortedTableList.size() > 0) {
                for (SortCriterion sc : sortedTableList) {
                    if (sc.getProperty().equals(sc.getProperty())) {
                        sortedTableList.remove(sc);
                        return true;
                    }
                }
            }
            return false;
        }
    

    Now logic to apply programmatic sort starts from here , we have to sort List using Java Comparator interface
    To Read more - How to sort ArrayList using Comparator?     Comparator interface

        private void applySortAsPerColumn(String criteria) {
            //Get List that populates table
            List<PersonBean> list = getPersonList();
            //Check which column's sorting is triggered from UI
            //and then sort list on basis of that attribute
            //Sorting of collection makes use of Comparator interface, Read about it
            if ("name".equalsIgnoreCase(criteria)) {
                Collections.sort(list, new ProgTableBean.PersName());
            } else if ("mobNo".equalsIgnoreCase(criteria)) {
                Collections.sort(list, new ProgTableBean.MobNo());
            } else if ("salary".equalsIgnoreCase(criteria)) {
                Collections.sort(list, new ProgTableBean.Salary());
            }
        }
        // Comparator for all attributes to sort List according to different attributes
    
        public static class PersName implements Comparator<PersonBean> {
            private int flag = 1;
    
            @Override
            public int compare(PersonBean o1, PersonBean o2) {
                return flag * o1.getName().compareTo(o2.getName());
            }
        }
    
    
        public static class MobNo implements Comparator<PersonBean> {
            private int flag = 1;
    
            @Override
            public int compare(PersonBean o1, PersonBean o2) {
                System.out.println("In 2**");
                return flag * o1.getMobNo().compareTo(o2.getMobNo());
    
            }
        }
    
    
        public static class Salary implements Comparator<PersonBean> {
            private int flag = 1;
    
            @Override
            public int compare(PersonBean o1, PersonBean o2) {
                return flag * o1.getSalary().compareTo(o2.getSalary());
            }
        }


  • Now on page ,select table and set sortable true for each column and set sortProperty same as column name
    Check af:table source after setting all properties

  • <af:table var="row" rowBandingInterval="1" id="t1" value="#{viewScope.ProgTableBean.personList}"
                              partialTriggers="::b1" rowSelection="multiple" binding="#{viewScope.ProgTableBean.tableBind}"
                              selectionListener="#{viewScope.ProgTableBean.tableSelection}"
                              sortListener="#{viewScope.ProgTableBean.tableSortListener}">
                        <af:column sortable="true" headerText="Name" id="c1" width="150" sortProperty="name">
                            <af:outputText value="#{row.name}" id="ot1"/>
                        </af:column>
                        <af:column sortable="true" headerText="Mobile Number" id="c2" sortProperty="mobNo">
                            <af:outputText value="#{row.mobNo}" id="ot2"/>
                        </af:column>
                        <af:column sortable="true" headerText="Salary" id="c3" align="right" sortProperty="salary">
                            <af:outputText value="#{row.salary}" id="ot3"/>
                        </af:column>
                    </af:table>
    

  • All done :) , Run and check application


Sample ADF Application -Download
Cheers :) Happy Learning

Thursday 16 July 2015

Get selected row (single/multiple) from POJO based table in ADF


Previously i have posted about populating af:table from managed bean using POJO and adding records in it, Check this-
Populate af:table programmatically from managead bean using POJO 
In this post i am extending previous post application
This post is about getting selected row from POJO based table , It is a common requirement while using af:table based on POJO

Get single row using custom selection listener-


SelectionListener  handles selection event of table , whenever user selects a row in table ,selection listener is fired
Set table RowSelection property to single (to select one row at a time) or multiple (to select multiple row ) and create a custom selection listener in managed bean that will handle table's selection event


See selection listener code in managed bean we can get selected row  using this -


import oracle.adf.view.rich.component.rich.data.RichTable;
import org.apache.myfaces.trinidad.event.SelectionEvent;

 /**Method to get selected row(single)
     * @param selectionEvent
     */
    public void tableSelection(SelectionEvent selectionEvent) {
        //Get table from selectionEvent
        RichTable richTable = (RichTable) selectionEvent.getSource();
        //Cast to the List that populates table
        PersonBean row = (PersonBean) richTable.getSelectedRowData();
        //Get the attributes (column) from list
        System.out.println(row.getName());
    }

Now check this -

 Output on console :)

Get single/multiple selected row on a button click (ActionEvent)-


Set table RowSelection to multiple and select multiple row using Ctrl key of your keyboard
and check this code to get multiple selected row using RowKeySet, We can get all row using getSelectedRowKeys method


import org.apache.myfaces.trinidad.model.RowKeySet;
import java.util.Iterator;    


/**Method to get all selected record in af:table
     * @param actionEvent
     */
    public void getSelectedRecord(ActionEvent actionEvent) {
        //getTableBind is binding of table on page.
        RowKeySet selectedEmps = getTableBind().getSelectedRowKeys();
        //Create iterator from RowKeySet
        Iterator selectedEmpIter = selectedEmps.iterator();

        while (selectedEmpIter.hasNext()) {
            String i = selectedEmpIter.next().toString();
            //personList is the list used to populate table and name is a column of table
            //So here filter list using index and get values then
            PersonBean rowIter = personList.get(Integer.parseInt(i));
            System.out.println(rowIter.getName());
        }
       
    }

Now run and check again -

 Output on console :)

Sample ADF Application- Download
Cheers :) Happy Learning

Friday 3 April 2015

Stretch ADF Faces Components to fit browser width (Show as row-column layout- inline block )

Recently i have seen a thread in OTN about layout of components (How to use components to show a particular layout)
ADF layout for showing email recipients

Requirement was simple, user want to show components up to maximum available width (browser window width) first and then move to next line and show other components
So i thought to document it here :)

Suppose i have to show 6 images on page (horizontally) , so for that i have used 6 group layout
one for each image and button


See xml source-

<af:panelGroupLayout id="pgl1" layout="horizontal">
                    <af:panelGroupLayout id="pgl2" layout="vertical" halign="center"
                                         inlineStyle="padding:2px;">
                        <af:image source="#{resource['images:a_hobbit_house-wallpaper-1280x800.jpg']}"
                                  shortDesc="Hobbit House" id="i1" inlineStyle="width:250px;height:200px; "/>
                        <af:button text="View" id="b1"/>
                    </af:panelGroupLayout>
                    <af:panelGroupLayout id="pgl3" layout="vertical" halign="center"
                                         inlineStyle="padding:2px;">
                        <af:image source="#{resource['images:beach_at_sunset_3-wallpaper-1440x900.jpg']}"
                                  shortDesc="Sunset at Beach" id="i2" inlineStyle="width:250px;height:200px; "/>
                        <af:button text="View" id="b2"/>
                    </af:panelGroupLayout>
                    <af:panelGroupLayout id="pgl4" layout="vertical" halign="center" inlineStyle="padding:2px;">
                        <af:image source="#{resource['images:icelands_ring_road-wide.jpg']}" shortDesc="Ring Road"
                                  id="i3" inlineStyle="width:250px;height:200px; "/>
                        <af:button text="View" id="b3"/>
                    </af:panelGroupLayout>
                    <af:panelGroupLayout id="pgl5" layout="vertical" halign="center" inlineStyle="padding:2px;">
                        <af:image source="#{resource['images:road_to_mount_cook-wallpaper-1280x800.jpg']}"
                                  shortDesc="Road To Mount Cook" id="i4" inlineStyle="width:250px;height:200px; "/>
                        <af:button text="View" id="b4"/>
                    </af:panelGroupLayout>
                    <af:panelGroupLayout id="pgl6" layout="vertical" halign="center" inlineStyle="padding:2px;">
                        <af:image source="#{resource['images:skyscrapers_reflections-wallpaper-1280x800.jpg']}"
                                  shortDesc="Skycrappers " id="i5" inlineStyle="width:250px;height:200px; "/>
                        <af:button text="View" id="b5"/>
                    </af:panelGroupLayout>
                    <af:panelGroupLayout id="pgl7" layout="vertical" halign="center" inlineStyle="padding:2px;">
                        <af:image source="#{resource['images:tufandisli_1387241118_57.jpg']}" shortDesc="Tufan"
                                  id="i6" inlineStyle="width:250px;height:200px; "/>
                        <af:button text="View" id="b6"/>
                    </af:panelGroupLayout>
                </af:panelGroupLayout>

 and how it looks on page-


You can see here last image is not appearing properly because total width of all images has crossed maximum available width of browser window
Now i want to show last image on next line
So to do this set parent panel group layout to default layout and set display:inline-block for all child panel group layout


<af:panelGroupLayout id="pgl1">
                    <af:panelGroupLayout id="pgl2" layout="vertical" halign="center"
                                         inlineStyle="padding:2px;display:inline-block;">
                        <af:image source="#{resource['images:a_hobbit_house-wallpaper-1280x800.jpg']}"
                                  shortDesc="Hobbit House" id="i1" inlineStyle="width:250px;height:200px; "/>
                        <af:button text="View" id="b1"/>
                    </af:panelGroupLayout>
                    <af:panelGroupLayout id="pgl3" layout="vertical" halign="center"
                                         inlineStyle="padding:2px;display:inline-block;">
                        <af:image source="#{resource['images:beach_at_sunset_3-wallpaper-1440x900.jpg']}"
                                  shortDesc="Sunset at Beach" id="i2" inlineStyle="width:250px;height:200px; "/>
                        <af:button text="View" id="b2"/>
                    </af:panelGroupLayout>
                    <af:panelGroupLayout id="pgl4" layout="vertical" halign="center"
                                         inlineStyle="padding:2px;display:inline-block;">
                        <af:image source="#{resource['images:icelands_ring_road-wide.jpg']}" shortDesc="Ring Road"
                                  id="i3" inlineStyle="width:250px;height:200px; "/>
                        <af:button text="View" id="b3"/>
                    </af:panelGroupLayout>
                    <af:panelGroupLayout id="pgl5" layout="vertical" halign="center"
                                         inlineStyle="padding:2px;display:inline-block;">
                        <af:image source="#{resource['images:road_to_mount_cook-wallpaper-1280x800.jpg']}"
                                  shortDesc="Road To Mount Cook" id="i4" inlineStyle="width:250px;height:200px; "/>
                        <af:button text="View" id="b4"/>
                    </af:panelGroupLayout>
                    <af:panelGroupLayout id="pgl6" layout="vertical" halign="center"
                                         inlineStyle="padding:2px;display:inline-block;">
                        <af:image source="#{resource['images:skyscrapers_reflections-wallpaper-1280x800.jpg']}"
                                  shortDesc="Skycrappers " id="i5" inlineStyle="width:250px;height:200px; "/>
                        <af:button text="View" id="b5"/>
                    </af:panelGroupLayout>
                    <af:panelGroupLayout id="pgl7" layout="vertical" halign="center"
                                         inlineStyle="padding:2px;display:inline-block;">
                        <af:image source="#{resource['images:tufandisli_1387241118_57.jpg']}" shortDesc="Tufan"
                                  id="i6" inlineStyle="width:250px;height:200px; "/>
                        <af:button text="View" id="b6"/>
                    </af:panelGroupLayout>
                </af:panelGroupLayout>

Now it appears like this -

now again test it by increasing and decreasing browser window width , images and group layout are adjusted as per screen size automatically like a grid view (row and columns)

Thanks , Happy Learning :)
Sample ADF Application- Download

Tuesday 17 March 2015

Searching pivotTable using dvt:pivotFilterBar in Oracle ADF


dvt:pivotTable-

From Oracle docs- The Pivot Table supports the display of multiple nested attributes on a row and column header. In addition, the Pivot Table supports the ability to dynamically change the layout of the attributes displayed in the row or column headers via drag and drop pivoting.

Framework provides  <dvt:pivotFilterBar>component to perform search operation on pivotTable
The PivotFilterBar component is used to filter data based on the selected criterion belonging to the PivotableQueryDescriptor as specified by the value property


In this example i am using Departments and Employees table of HR Schema, Created a query based viewObject using this query (to show Departments and it's Employees)


SELECT A.DEPARTMENT_ID,  
B.EMPLOYEE_ID, 
A.DEPARTMENT_NAME , 
B.FIRST_NAME||' '||B.LAST_NAME AS NAME,  
B.EMAIL,  
B.PHONE_NUMBER, 
B.HIRE_DATE, 
B.JOB_ID, 
B.SALARY, 
B.COMMISSION_PCT 
FROM DEPARTMENTS A, EMPLOYEES B 
WHERE A.DEPARTMENT_ID=B.DEPARTMENT_ID

Add this viewObject to Application Module and drop on page as pivot table from Data Control
Configuration for pivotTable-

Pivot Table data set


Pivot Table Drilling

Finally it looks like this-

Now i have dropped <dvt:pivotTable> on page and it automatically sets it's properties that are required for filtering pivotTable


<dvt:pivotFilterBar id="pt1pivotFilterBar" value="#{bindings.DeptEmp1.pivotFilterBarModel}"
                                    modelName="pt1Model"/>

Once check that modelName property should be same for both pivotTable and filterbar
Now run this application and drop any column on filterbar that you want to search

Pivot Filter bar (Oracle ADF)
Sample ADF Application-Download
Cheers :) Happy Learning

Monday 16 February 2015

Working with af:iterator and af:forEach programmatically (Add and delete records using List)

In previous post Working with af:iterator and af:forEach programmatically (Populate values using POJO from Managed Bean) we saw that how can we populate record from a List to af:iterator and af:forEach (ADF Faces Component)

So this post is about adding and deleting of records from List while List is presented using af:iterator.
here i am extending previous post and using same sample application


Added two fields and button on page to add records 


<af:panelFormLayout id="pfl1" rows="1">
                    <af:inputText label="Name" id="it1" binding="#{viewScope.PopulateIteratorBean.nameBind}"/>
                    <af:inputText label="Department" id="it2" binding="#{viewScope.PopulateIteratorBean.deptNameBind}"/>
                    <af:button text="Add" id="b1"
                               actionListener="#{viewScope.PopulateIteratorBean.addNewRecordAction}"/>
                </af:panelFormLayout>


and on this button action simply added both attributes to List and added partial trigger of button to af:iterator to refresh it


    // Component binding to access inputValue from page
    
    private RichInputText nameBind;
    private RichInputText deptNameBind;
    
    public void setNameBind(RichInputText nameBind) {
        this.nameBind = nameBind;
    }

    public RichInputText getNameBind() {
        return nameBind;
    }

    public void setDeptNameBind(RichInputText deptNameBind) {
        this.deptNameBind = deptNameBind;
    }

    public RichInputText getDeptNameBind() {
        return deptNameBind;
    }

    /**Method to add record in List and show on page using af:iterator and af:forEach
     * @param actionEvent
     */
    public void addNewRecordAction(ActionEvent actionEvent) {
        if (nameBind.getValue() != null && deptNameBind.getValue() != null) {
            EmployeeDet obj = new EmployeeDet(nameBind.getValue().toString(), deptNameBind.getValue().toString());
            employeeDetail.add(obj);
            
        }
    }


On page - add a new record (record added in List and appeared in iterator as well)


So it is quite simple to add records but deletion of record is a bit tricky but not difficult at all :)
Let's see this-
For deleting record i have added a delete link inside iterator so that it should appear for each record as you can see in snap (above)
Here question is that how to know that which record should be deleted  ?

So for this i have added a f:attribute tag to link , this attribute contains the value of current item of iterator


f:attribute derives it's value from var of af:iterator/af:forEach, this var represents each item of List
Now on delete button's action - get the current item and remove it from List


    /**Method to delete selected record
     * @param actionEvent
     */
    public void deleteRecordAction(ActionEvent actionEvent) {
        //Get value from f:attribute (current item)
       Object itemVal= actionEvent.getComponent().getAttributes().get("itemVal");
       //Remove selected item from List
       employeeDetail.remove(itemVal);
    }

After deleting records

Sample ADF Application- Download
Tuesday 10 February 2015

Working with af:iterator and af:forEach programmatically (Populate values using POJO from Managed Bean)


This is another post about Working programmatically with ADF (populating af:iterator and af:forEach programmatically )

Previously i have posted about populating af:iterator and af:forEach using ADF BC and binding layer to show master-detail relation
Implementing master/detail tree relation using af:Iterator and af:forEach for better UI designs - Oracle ADF

For this post i am populating employee name and it's department name using List datastructure ,to get and set value of attributes

Created a java bean class , it has 2 variable for both attributes


public class EmployeeDet {
    public EmployeeDet(String name, String deptName) {
        this.name = name;
        this.deptName = deptName;
    }
    //Attribute to display EmployeeName and Department Name
    private String name;
    private String deptName;

    public void setName(String name) {
        this.name = name;
    }

    public String getName() {
        return name;
    }

    public void setDeptName(String deptName) {
        this.deptName = deptName;
    }

    public String getDeptName() {
        return deptName;
    }
}

Next step is to create a managed bean to populate data in af:iterator and af:forEach , this managed bean makes use of
EmployeeDet 
java bean class to add data in same format for all items of iterator and forEach. A List data structure is used to pass all values to iterator. See code of managed bean 


    //Constructor-populate default records
    public PopulateIteratorBean() {

        EmployeeDet obj = new EmployeeDet("Ashish Awasthi", "Oracle ADF");
        employeeDetail.add(obj);
        obj = new EmployeeDet("Alex Smith", "Java");
        employeeDetail.add(obj);
        obj = new EmployeeDet("James S", "PHP");
        employeeDetail.add(obj);
    }
    //ArrayList to poplate data in af:iterator and af:forEach
    private List<EmployeeDet> employeeDetail = new ArrayList();

    public void setEmployeeDetail(List<EmployeeDet> employeeDetail) {
        this.employeeDetail = employeeDetail;
    }

    public List<EmployeeDet> getEmployeeDetail() {

        return employeeDetail;
    }

Now drop af:iterator on page and set it's properties like value, var etc


using var reference of iterator , set value in output text to show Employee Name and DepartmentName , see XML source of af:iterator


<af:panelGroupLayout id="pgl1" layout="horizontal">
                        <af:iterator id="i1" value="#{viewScope.PopulateIteratorBean.employeeDetail}" var="item">
                            <af:panelBox id="pb2" showDisclosure="false">
                                <f:facet name="toolbar"/>
                                <af:panelGroupLayout id="pgl3" layout="horizontal">
                                    <af:outputText value="#{item.name}" id="ot1"
                                                   inlineStyle="font-weight:bold; font-size:medium; color:#0572ce;;"/>
                                    <af:spacer width="2" height="0" id="s1"/>
                                    <af:outputText value="(#{item.deptName})" id="ot2"
                                                   inlineStyle="font-weight:bold;font-size:small;color:red;"/>
                                </af:panelGroupLayout>
                            </af:panelBox>
                        </af:iterator>
                    </af:panelGroupLayout>  

on running it looks like this-


do same for af:forEach


<af:panelGroupLayout id="pgl2" layout="horizontal">
                        <af:forEach items="#{viewScope.PopulateIteratorBean.employeeDetail}" var="feach">
                            <af:showDetailHeader text="#{feach.deptName}" disclosed="true" id="sdh1">
                                <af:outputText value="#{feach.name}" id="ot3"
                                               inlineStyle="font-weight:bold; font-size:medium; color:#0572ce;;"/>
                            </af:showDetailHeader>
                        </af:forEach>
                    </af:panelGroupLayout>

on running it looks like this-
 Sample ADF Application-Download
Thanks, Happy Learning :)