Please disable your adblock and script blockers to view this page

Search this blog

Showing posts with label Happy New Year. Show all posts

Wednesday 4 January 2017

Invitation to Write for My Blog - A New Start on this New Year


Hello All

I am thinking about doing something new in this New Year and for that I thought about guest blog posts for deeper knowledge and information

If you have some great content that you would like to share with world then I have this good news for you, I am accepting guests blog posts for this blog (www.awasthiashish.com)

Monday 2 January 2017

Best Wishes- Happy New Year 2017

Another year filled with memories and joyous times has passed

Another year filled with endless possibilities and happiness has come


You all have made my year very special, and I wish a very Happy New Year to all of you


Every New Year gives you the perfect chance to start something new and fresh. So do your bit this year and make the world a better place for yourself and others


Thanks everyone for your love and support :) :) 


Tuesday 5 January 2016

Get selected slice of dvt:pieChart using custom selection listener in ADF

First of all wishing a very Happy New Year to all of you, New Year is like a blank page , fill it with happiness and good memories


This post is about a simple requirement - How to get selected slice value of dvt:pieChart ?
So for this we have to create a custom selection Listener in managed bean that will be called whenever user selects any slice of pieChart
If you see documentation of pieChart it tells about two properties -

Friday 2 January 2015

Using captcha with ADF Faces (Integrate Kaptcha project with Oracle ADF)


First of all wishing a very Happy New Year to all of you, learn more n more ADF this year :)


This post is about using captcha challenge in ADF Faces, captcha is used to determine whether user is a human or not
CAPTCHA stands for-Completely Automated Public Turing test to tell Computers and Humans Apart
Frank Nimphius posted about 'captcha with ADF Faces' using "Simple Captcha" project.
You can read complete article- http://www.oracle.com/technetwork/developer-tools/jdev/captcha-099103.html


For this post I am using modern version of simplecaptcha project called Kaptcha, project provides a servlet that is responsible for generating captcha image and there are various configuration parameters to change look n feel of captcha image
See project documentation - https://code.google.com/p/kaptcha/
Download jar file- https://code.google.com/p/kaptcha/downloads/list

Now see the steps to integrate Kaptcha project with Oracle ADF
  • Create a FusionWeb Application, attach kaptcha-2.3.2 jar to viewController project, also see How to use "Kaptcha"-https://code.google.com/p/kaptcha/wiki/HowToUse


  • Next step is to add kaptcha servlet reference in web.xml file

  •  <servlet>
            <servlet-name>Kaptcha</servlet-name>
            <servlet-class>com.google.code.kaptcha.servlet.KaptchaServlet</servlet-class>
        </servlet>
        <servlet-mapping>
            <servlet-name>Kaptcha</servlet-name>
            <url-pattern>/kaptchaimage</url-pattern>
        </servlet-mapping>
    

  • Add an af:image on page to show captcha, image source is referenced from servlet mapping

  • <af:image id="i1" partialtriggers="l1" shortdesc="Captcha" source="/kaptchaimage">
    

  • Default configuration for captcha image is completed , I have added an af:inputText and button on page to enter captcha result .

  • <af:panelBox text="Captcha Demo- www.awasthiashish.com" id="pb1" showDisclosure="false"
                                     inlineStyle="width:350px;">
                            <f:facet name="toolbar"/>
                            <af:spacer width="0" height="10" id="s3"/>
                            <af:panelFormLayout id="pfl1">
                                <af:panelGroupLayout id="pgl1" layout="horizontal">
                                    <af:image source="/kaptchaimage" id="i1" partialTriggers="l1" shortDesc="Captcha"/>
                                    <af:spacer width="10" height="0" id="s4"/>
                                    <af:link id="l1" icon="#{resource['images:reload.png']}" shortDesc="Refresh Captcha"/>
                                </af:panelGroupLayout>
                                <af:inputText label="Enter text" id="it1" binding="#{ReadCaptchaBean.entrdCaptchaBind}"
                                              contentStyle="font-weight:bold;"/>
                                <af:button text="Submit" id="b1" actionListener="#{ReadCaptchaBean.readCaptchAction}"/>
                            </af:panelFormLayout>
                        </af:panelBox>
    

  • Run application and see how captcha image is appearing on page


  • It looks good :-), now see the managed bean code written in submit button's action. This code checks actual captcha value with entered value

  •     //Binding of inputText to get entered value
        private RichInputText entrdCaptchaBind;
    
        public void setEntrdCaptchaBind(RichInputText entrdCaptchaBind) {
            this.entrdCaptchaBind = entrdCaptchaBind;
        }
    
        public RichInputText getEntrdCaptchaBind() {
            return entrdCaptchaBind;
        }
        
        /**Method to check whether entered value is correct or not
         * @param actionEvent
         */
        public void readCaptchaAction(ActionEvent actionEvent) {
            FacesContext fctx = FacesContext.getCurrentInstance();
            ExternalContext ectx = fctx.getExternalContext();
            HttpServletRequest request = (HttpServletRequest) ectx.getRequest();
            //KAPTCHA_SESSION_KEY- The value for the kaptcha is generated and is put into the HttpSession. This is the key value for that item in the session.
            String kaptchaExpected =
                (String) request.getSession().getAttribute(com.google.code.kaptcha.Constants.KAPTCHA_SESSION_KEY);
            //Get entered value of captcha using inputText binding
            String kaptchaReceived = entrdCaptchaBind.getValue().toString();
            System.out.println("Entered Value-" + kaptchaReceived + " Expected Value-" + kaptchaExpected);
            if (kaptchaReceived == null || !kaptchaReceived.equalsIgnoreCase(kaptchaExpected)) {
                FacesMessage errMsg = new FacesMessage("Invalid Value");
                errMsg.setDetail("Incorrect captcha value- Not Human");
                errMsg.setSeverity(FacesMessage.SEVERITY_ERROR);
                fctx.addMessage(entrdCaptchaBind.getClientId(), errMsg);
            } else {
                FacesMessage errMsg = new FacesMessage("Correct Value");
                errMsg.setDetail("Hello this is the right guess");
                errMsg.setSeverity(FacesMessage.SEVERITY_INFO);
                fctx.addMessage(entrdCaptchaBind.getClientId(), errMsg);
            }
        }
    

  • Again run this application and enter value for captcha


  • So it is working , now to change captcha image added a link with partialSubmit=false and set partial trigger property on af:image.


  • Kaptcha integration with Oracle ADF is complete and it is working properly  now if you want to modify captcha look n feel then add some init-param (configuration parameter) in web.xml file.
    See complete list of configuration parameters- https://code.google.com/p/kaptcha/wiki/ConfigParameters
    I have changed some parameters value in web.xml , see changed source of web.xml and captcha output

  • <servlet>
            <servlet-name>Kaptcha</servlet-name>
            <servlet-class>com.google.code.kaptcha.servlet.KaptchaServlet</servlet-class>
            <init-param>
                <param-name>kaptcha.border</param-name>
                <param-value>yes</param-value>
            </init-param>
            <init-param>
                <param-name>kaptcha.border.color</param-name>
                <param-value>red</param-value>
            </init-param>
            <init-param>
                <param-name>kaptcha.border.thickness</param-name>
                <param-value>1</param-value>
            </init-param>
            <init-param>
                <param-name>kaptcha.image.width</param-name>
                <param-value>250</param-value>
            </init-param>
            <init-param>
                <param-name>kaptcha.image.height</param-name>
                <param-value>60</param-value>
            </init-param>
            <init-param>
                <param-name>kaptcha.textproducer.font.size</param-name>
                <param-value>35</param-value>
            </init-param>
            <init-param>
                <param-name>kaptcha.textproducer.font.color</param-name>
                <param-value>red</param-value>
            </init-param>
            <init-param>
                <param-name>kaptcha.background.clear.from</param-name>
                <param-value>orange</param-value>
            </init-param>
            <init-param>
                <param-name>kaptcha.textproducer.char.length</param-name>
                <param-value>7</param-value>
            </init-param>
        </servlet>
        <servlet-mapping>
            <servlet-name>Kaptcha</servlet-name>
            <url-pattern>/kaptchaimage</url-pattern>
        </servlet-mapping>
    

    again run this application and check output

    Thanks, Happy Learning :)
    Download-Sample ADF Application

Friday 3 January 2014

Identifying Modified/newely added row in af:table, get all modified rows of viewobject in bean

Hello All,
first of all, a very Happy new year to everyone, learn more and more ADF


this tutorial is about a requirement of showing modified rows on page
Suppose if there is lot of data in af:table and user is modifying some rows then it must reflected immediately on page that which rows are modified for more clarity

Andrejus has also posted about it in 2010
http://andrejusb.blogspot.in/2010/04/changed-row-highlighting-in-oracle-adf.html

But this post talks about two requirements-
  1. Want to highlight modified rows only on page
  2. Want to get modified rows in managed bean
First One could be achieved without writing a single line of code only using expression, a row in table or view object has four state-


  • New
  • Modified
  • Un-Modified
  • Initialized


/* this expression returns state of current row in collection such as table or treeTable*/
#{row.row.entities[0].entityState} 

/*here row is reference variable of collection, this expression returns an int value if it is 
 2-Modified
 0-New
 1-Unmodified
-1-Initialized
*/

  • I'm using Departments table of HR Schema to implement this sample app
  • after business components configuration ,Drop departments VO from data control on page as af:table
  • Now to check row status , i have written following expression in inline style of af:column of af:table, so that it can check state of all rows of table 

  • #{row.row.entities[0].entityState==2 ? 'background-color:orange' : row.row.entities[0].entityState==0 ? 'background-color:darkgreen' : ''} 
    

  • Now Run your page and change any value of table
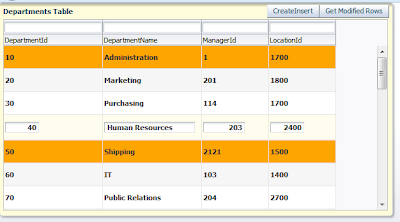
       After Updating Values in Row- see modified rows are highlighted
  •  Now you are done with first requirement , if we talk about second one, in case you want to get all modified rows in managed bean to perform some operation
  • To achieve this i have used a transient attribute in Departments view Object to store state of each row
  • Now in RowImpl of departments viewobject i have to write some code to get current state of Row, see the getter method of transient attribute in RowImpl

  •     /**
         * Gets the attribute value for the calculated attribute CheckRowStatus.
         * @return the CheckRowStatus
         */
        public Integer getCheckRowStatus() {
            byte entityState = this.getEntity(0).getEntityState();
            return new Integer(entityState);
    
            // return (Integer) getAttributeInternal(CHECKROWSTATUS);
        }
    

  • Now i have placed a button on page to get all modified rows and show a message on page through managed bean
  • See the method written in ApplicationModuleImpl class and then exposed to client to be used in managed bean action event

  •     /**Method to get all modified rows and store corresponding Department Name in an ArrayList
         * @return
         */
        public ArrayList<String> getModifiedRows() {
            ArrayList<String> deptNm = new ArrayList<String>();
            ViewObject deptVo = this.getDepartmentsView1();
            RowSetIterator deptIter = deptVo.createRowSetIterator(null);
            while (deptIter.hasNext()) {
                Row nextRow = deptIter.next();
                if (nextRow.getAttribute("CheckRowStatus") != null) {
                    Integer rowStatus = (Integer)nextRow.getAttribute("CheckRowStatus");
                    if (rowStatus == 2) {
                        deptNm.add(nextRow.getAttribute("DepartmentName").toString());
                    }
                }
            }
            return deptNm;
    
        }
    

  • Now call this method in managed bean through Binding Layer

  •     /**Method to get BindingContainer of current page
         * @return
         */
        public BindingContainer getBindings() {
            return BindingContext.getCurrent().getCurrentBindingsEntry();
        }
    
        /**Method to call AM method and to show modified rows on page in FacesMessage
         * @param actionEvent
         */
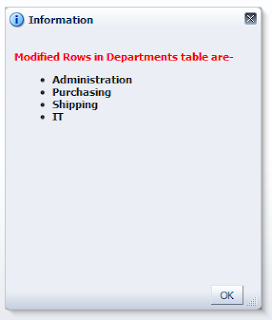
        public void getModifiedRows(ActionEvent actionEvent) {
            OperationBinding ob = getBindings().getOperationBinding("getModifiedRows");
            ob.execute();
            if (ob.getResult() != null) {
                ArrayList<String> deptName = (ArrayList<String>)ob.getResult();
                StringBuilder saveMsg =
                    new StringBuilder("<html><body><b><p style='color:red'>Modified Rows in Departments table are-</p></b>");
    
                saveMsg.append("<ul>");
                for (String name : deptName) {
                    System.out.println(name);
                    saveMsg.append("<li> <b>" + name + "</b></li>");
                }
    
                saveMsg.append("</ul><br>");
                saveMsg.append("</body></html>");
                FacesMessage msg = new FacesMessage(saveMsg.toString());
                FacesContext.getCurrentInstance().addMessage(null, msg);
            }
        }
    

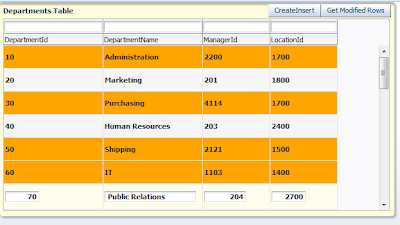
  • Now again run this page and change some departments then click on get modified rows, it will show currently modified rows

Cheers- Download Sample App